
Building a Turbokit replica for a GEM S2
Introduction
The back story
Installing the Gotek drive
The GEM S2 book by Colò and Gerbi
The circuit
Differences between the S2 and the S2 Turbo
Conclusion
Disclaimer
WARNING: assembling such a circuit will require a great deal of experience in electronics. If you fry your keyboard or harm yourself, please do not consider me responsible for that. This page is NOT A TUTORIAL. If you don't have sufficient experience on electronic circuits, this project is not for you.
Introduction
I got a GEM S2 synthesizer in 1996. It was an early model, non Turbo. I used it for many years even on stage and it was a good instrument. I wanted to install a Turbokit back then, but I never got the occasion to do it. After 2005, I did not use the synthesizer very often until 2025 when I took it out again. A brief search revealed that DitroniX successfully managed to build a replica of GEM's original Turbokit and all the information I needed was available. I therefore installed a Gotek disk drive emulator in the synthesizer and proceeded to design and build my own Turbokit.
This page describes the history of my synthesizer and how I managed to install the Gotek drive and (more importantly) the a replica of the Turbokit. I created a Mastodon thread dedicated to this project.
The back story
I have been interested in music since an early age. I started taking piano lessons at 11 and, a few years later I got good grades at school and I asked my parents to buy me a second-hand keyboard and a MIDI expander. It was 1996, the keyboard was a GEM S2 and the expander was a Proteus 2. I still own them today, thirty years later.
In this page I would like to describe a project that took me a few months, that is building a complete replica of the Turbokit for my GEM S2. The S2/S3 line was a series of very competent digital synthesizers that GEM (later called Generalmusic) started selling from about September 1992. Their development started in Elka and was carried on when GEM acquired Elka in 1989. They were built in Italy, at Recanati, in the Marche region, a place that for a moment had an incredible concentration of companies building interesting instruments (CRUMAR and Fatar are other examples).
The Turbokit was an expansion that GEM developed in 1993 (so less than one year after the initial release) to improve the performance of their S2 and S3 keyboards. Later keyboards already sported the expansion and were called S2 and S3 Turbo, but you could bring your non-Turbo keyboard to an authorized retailer and have the Turbokit expansion fitted to your instrument. That was not a trivial install and, even back then, it required a certain amount of modification to the processor board of the synth.
Those synthesizers were popular in Italy (and GEM was a very well-known name because of the WS2, which was a huge success). In the years 1996 to 1999, I knew at least two other teenagers who owned an S2 or an S3 (both were Turbo models) and an electronic engineer who chose to move from Turin to the Marche region to work in the GEM R&D department.
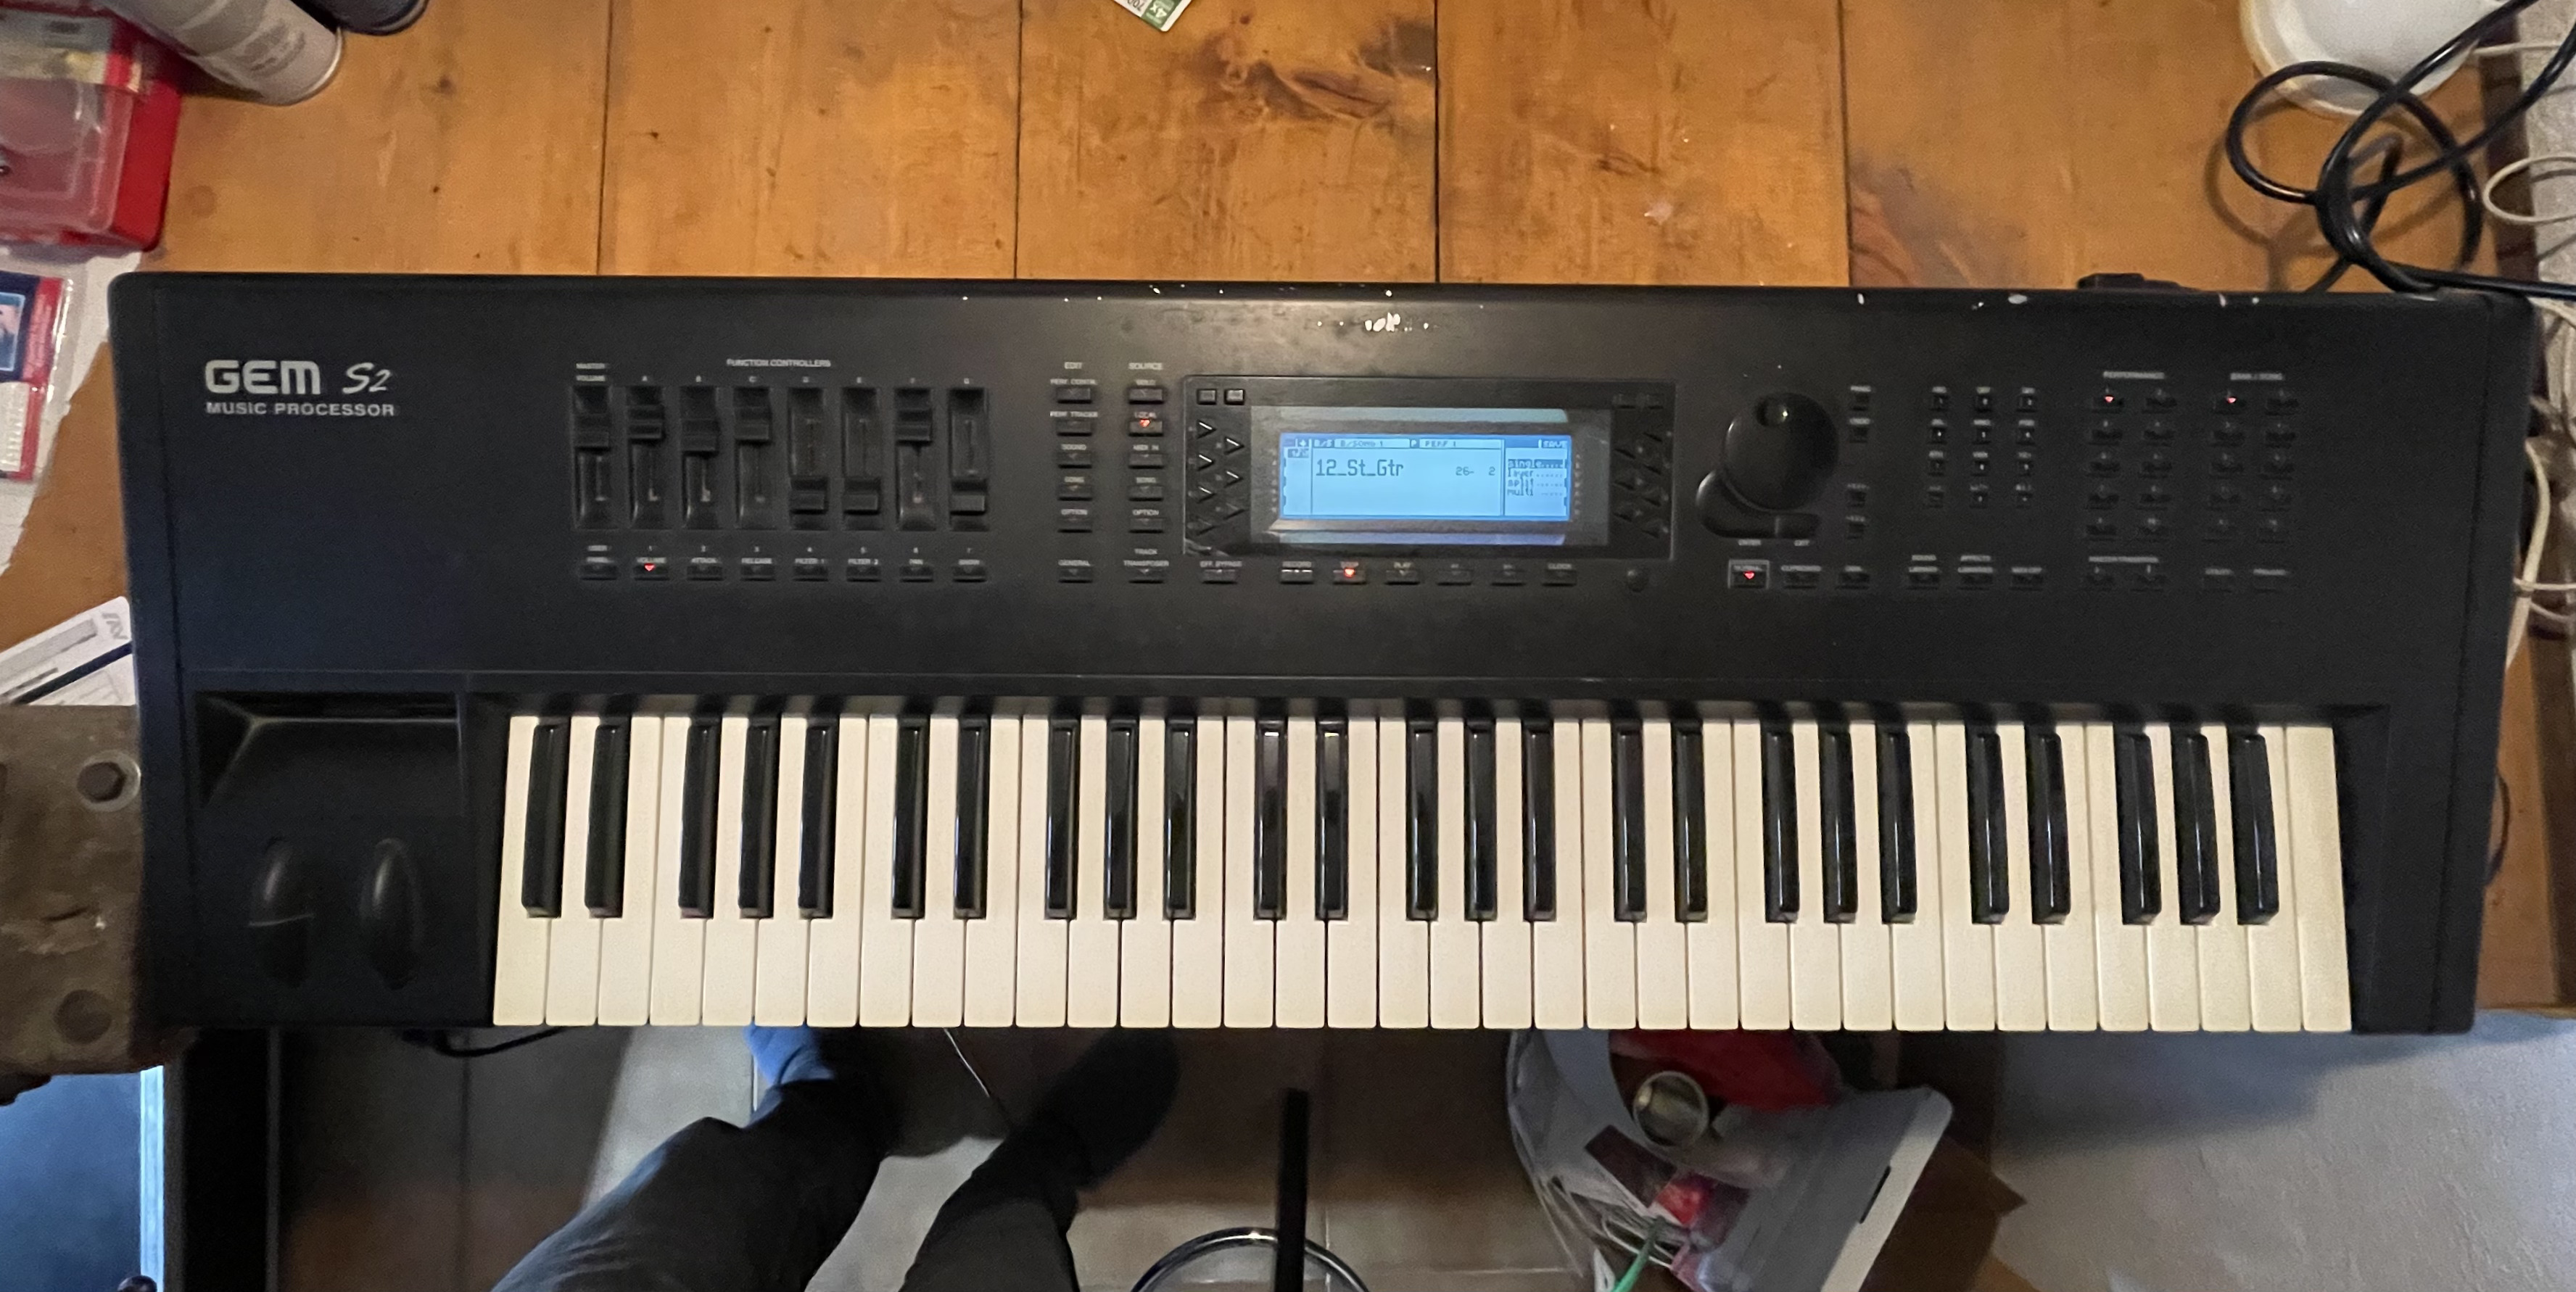
Fig. 1: my GEM S2 keyboard in August 2025.
Those synthesizers (along with the rack version S2R) were professional synthesizers. They were robustly built (and heavy!) and offered decent sound. People of my age could afford them only because it was a time of rapid technological development and, in the second half of the 1990s, they were starting to appear in the second-hand market. I was very happy with my S2, although I was a little frustrated that it wasn't a Turbo model.
I used the synthesizer more or less continuously from 1996 to 2005. In 2001, I discovered that there were people online sharing content about the S2/S3 synthesizers (mostly on an Italian website called Turbopage). I wrote a short tutorial about how to clean the encoder, which sometimes tends to become dirty and work unreliably. I was able to source there a program called Sample translator, and wrote a small tool to send MIDI samples via the SDS format. It is still available today on this site, but I do not know if it still works, as I haven't used Windows since about 2004.
In 2004, I bought a digital piano and was more interested in it as well as in singing. The S2 can imitate acoustic instruments in a way that was acceptable in 1992, but has become obsolete more than ten years later. I did not use my S2 very often after 2005 even if I was a little sad when I heard that Generalmusic ceased to exist in 2011. However, from 2022, I started again writing music regularly, becoming gradually more and more interested in electronic instruments. In August 2025, I stumbled into this amazing project by DitroniX, a modern replica of the original Turbokit for the S-series. Being an electronics engineer, the idea of building a replica of the Turbokit popped in my mind many times. However, before that moment, I thought that the essential information about it had been completely lost. Not only in 2025 did I discover that it was not the case, but also that DitroniX was able to build several ones, publishing the schematics of his circuit and the contents of the EPROMs!

Fig. 2: another view of my GEM S2 and its beautiful Fatar TP/8S semi-weighted keybed with poly aftertouch
That, combined with the fact that I was becoming more and more interested in electronic music, was enough to motivate me to use the S2 again. Figure 1 shows how she appears once she got out of her flight case. She still worked beautifully, but was dirty and quite beat up. The black finish used by GEM was a sort of soft-touch paint that was beautiful, but was quite fragile and there were some signs of damage. However, after 30 years it is more than normal. By the way, in the summer of 2025 I also had a short collaboration with Arturia, but this is another story...
Playing the S2 again, I realized that the feeling I got from the semi-weighted keyboard (figure 2) was one of the best I could experience, far better than the much more recent master keyboard I was using. I also discovered that the keybed was an old version of the well-known and highly considered Fatar TP8/S to which GEM added polyphonic aftertouch! I recalled perfectly the S2 implemented it, but at the time I did not realize that it was something quite rare, even among professional synths. As visible in figure 3, I opened the synthesizer to clean it and remove the dust that accumulated during the year. Apart that, everything was in a perfect shape, luckily.
This project was both an occasion to fulfill the desire to expand my keyboard I had since 1996 and learn to properly use KiCad to build a non-trivial PCB.

Fig. 3: inside my GEM S2 keyboard, in August 2025. It was dirty!
Installing the Gotek drive
Being interested in vintage computers, I am well acquainted with the Gotek disk drive emulation. For computers such as an Amiga 500, I tend to prefer to keep the original drives in place and install the Gotek drive externally as a second drive when it is possible. Unfortunately, this is not possible in the GEM S2 as you can not use a second disk drive. The advantages of using a USB stick to store hundreds of disk images are so evident, that I decided in this case to replace the internal drive (still working perfectly) with a Gotek emulator.
I bought a Gotek emulator with OLED display and encoder in a black case (a white/beige case would be out of place in the black case of the S2) and a recent revision of the Flash Floppy firmware already installed. It is easy to use as it directly supports the GEM/Generalmusic synthesizers (interface=jc, host=gem). If you are curious about the configuration file, here is mine. Figure 4 shows the Gotek drive being tested during the installation.
I noticed a small difference in the behavior of the synth with the Gotek drive in place. With the real disk drive, at startup, the synth immediately checks if a disk is present and, if it is the case, load it. This does not work with the Gotek. I think it is because it requires a few seconds to boot itself and is not ready to respond when the synth is checking if a disk is available.
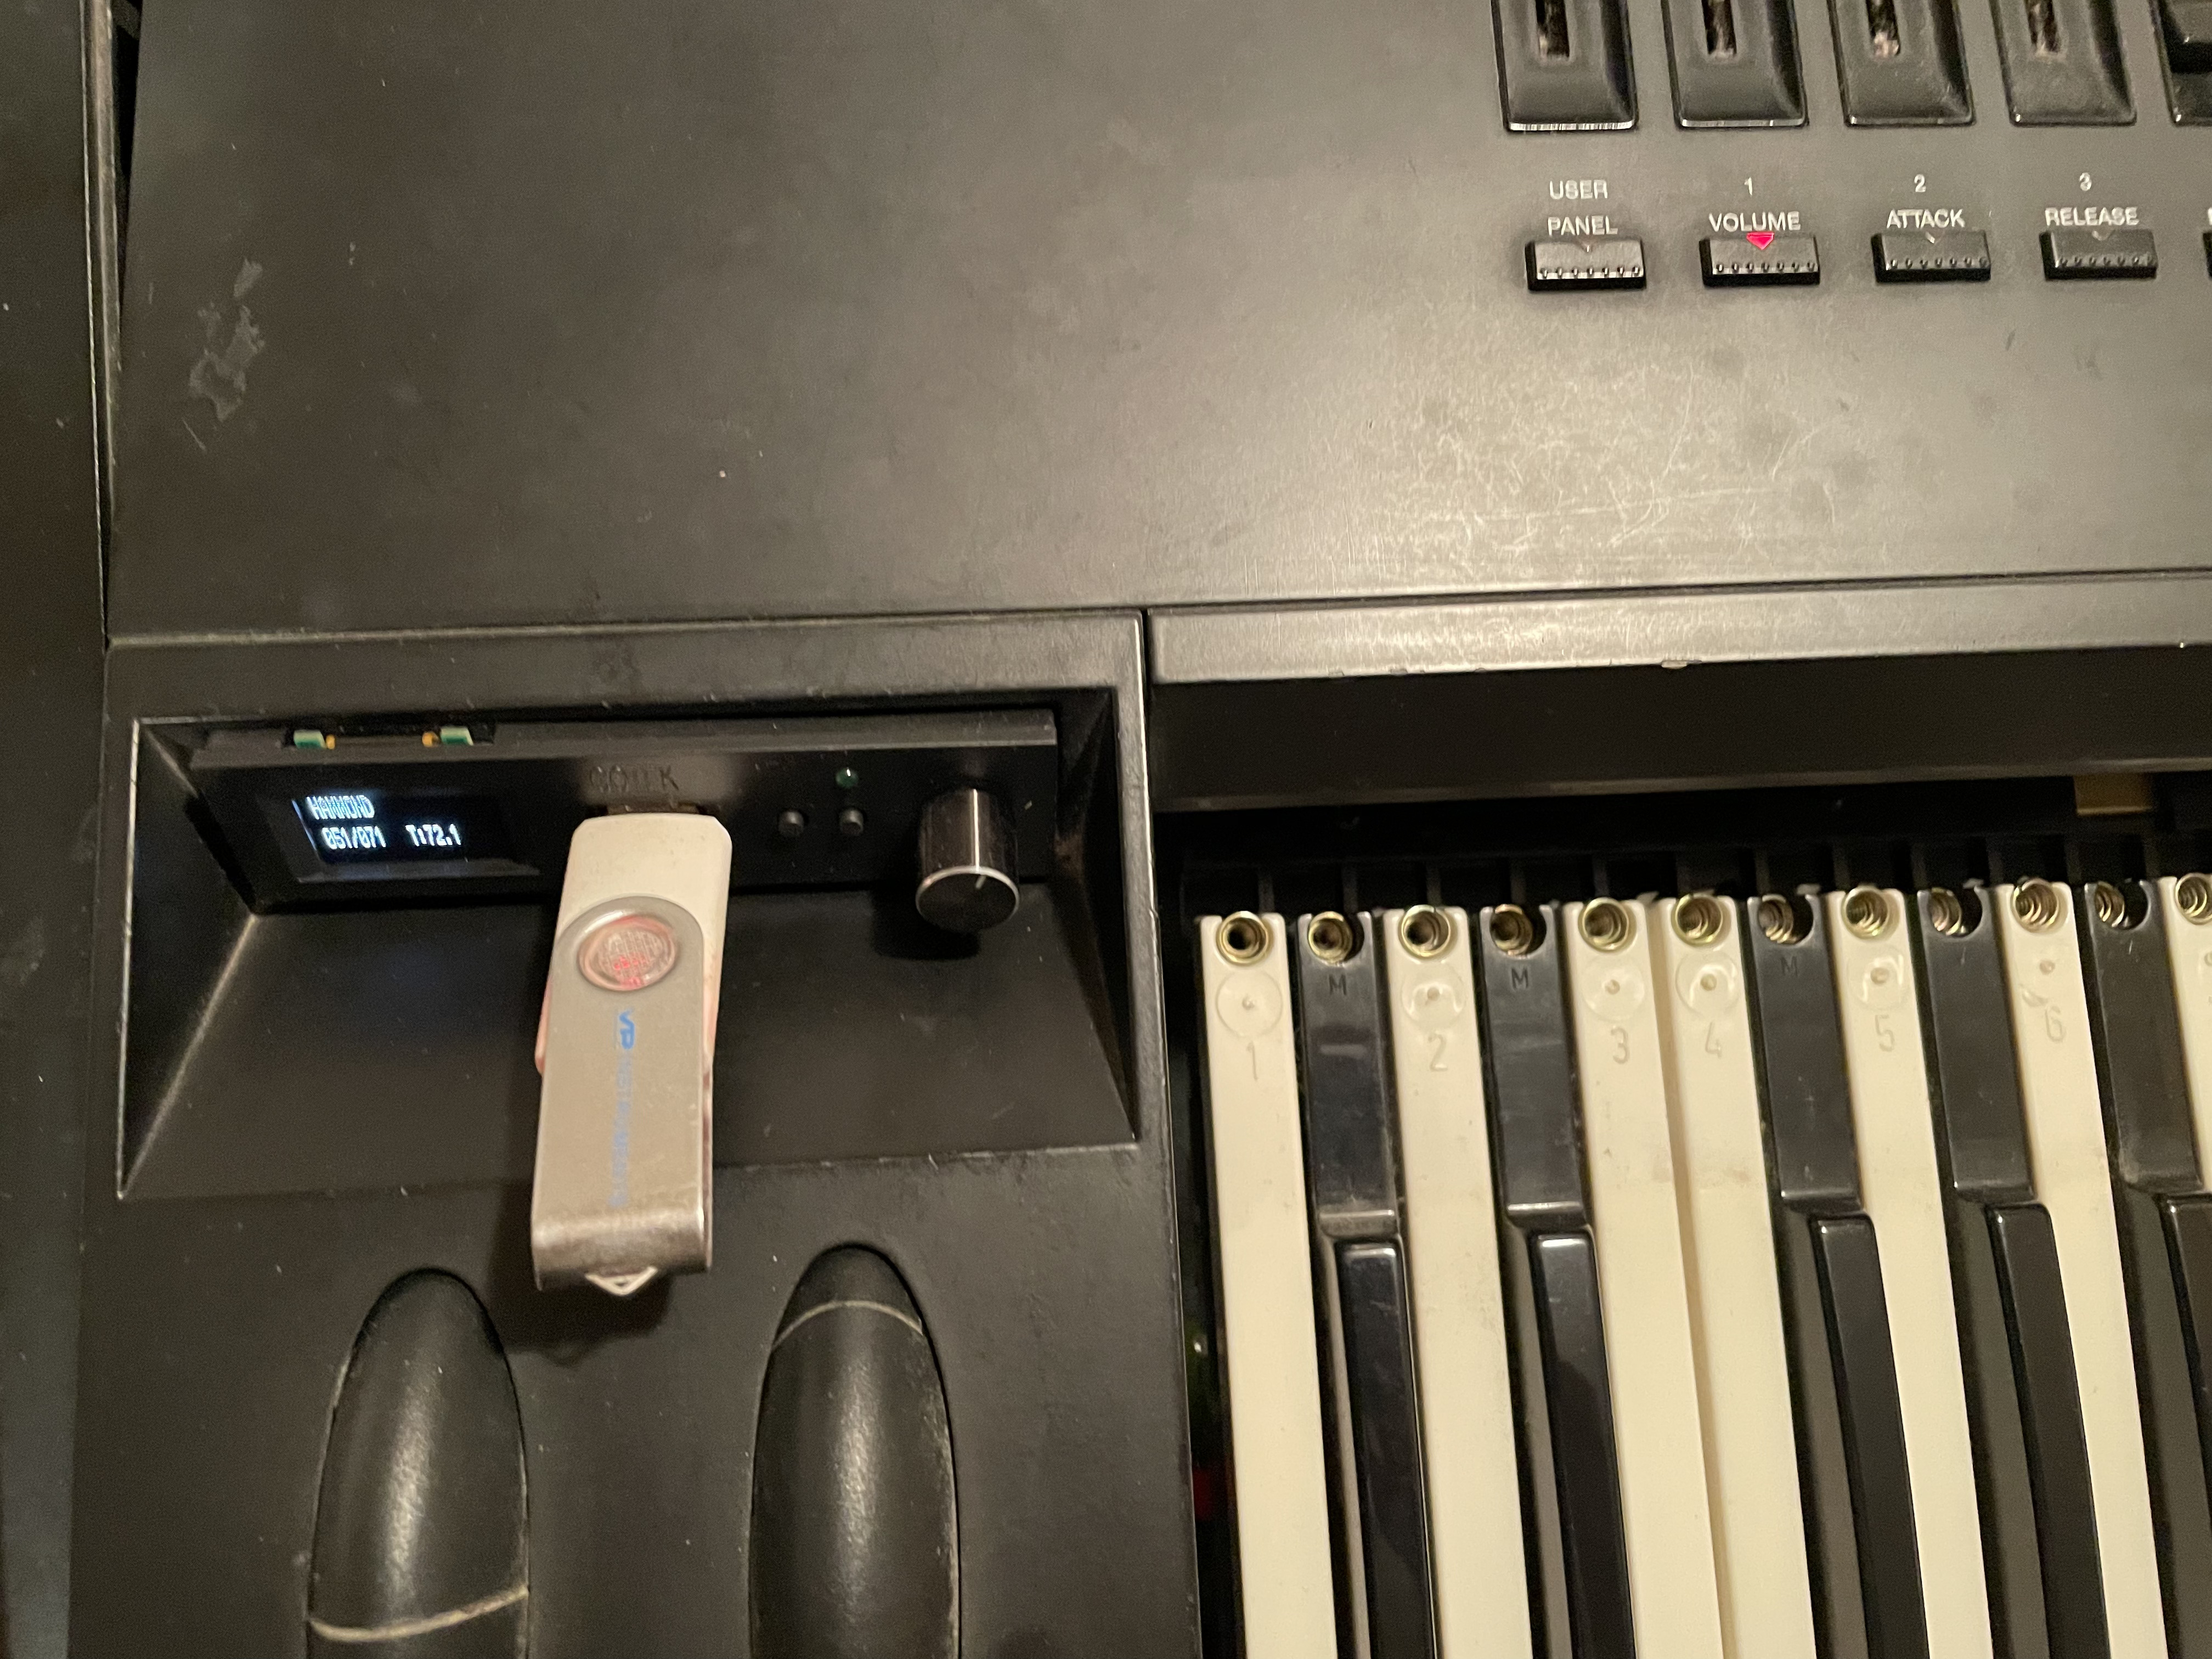
Fig. 4: the Gotek drive, during the initial tests.
The GEM S2 book by Colò and Gerbi
Exactly in the moment when I got interested again in the S2, I discovered that Marcello Colò, a person who was involved in the development of my beloved synth, along with Riccardo Gerbi, published a book about it. It is not expensive, and it was also distributed outside Italy, so I immediately bought it. My copy is visible in figure 5. It is a small book full of vivid and interesting anecdotes. Being an engineer myself, I love hearing about the people and the stories behind the products I love, so I read the book with great pleasure. If you read Italian, here is the link on Amazon where to buy it.
Colò and Gerbi describe that the S2 was the result of the choice to develop a professional high-performance synthesizer at a moment when GEM was capitalizing on the huge success of the WS2 arranger keyboard. The team was coordinated by Gianni Giudici. They clearly tried to build the best they could, but the initial response of the public when the product was released was not entirely positive. Part of the negative reviews were due to the fact that many (especially outside Italy) did not take GEM too seriously. Part of them, on the other hand, were justified and the Turbokit was an answer to those critics. I really appreciated that Colò and Gerbi described how Giudici took them very seriously and put all the team back to work to build the expansion. From the production labels that I found, my S2 was built between the end of September 1992 and the beginning of October of the same year. It's very interesting to find in the book the reports of meetings about a version that they called "S2 plus" dated October 16, 1992.
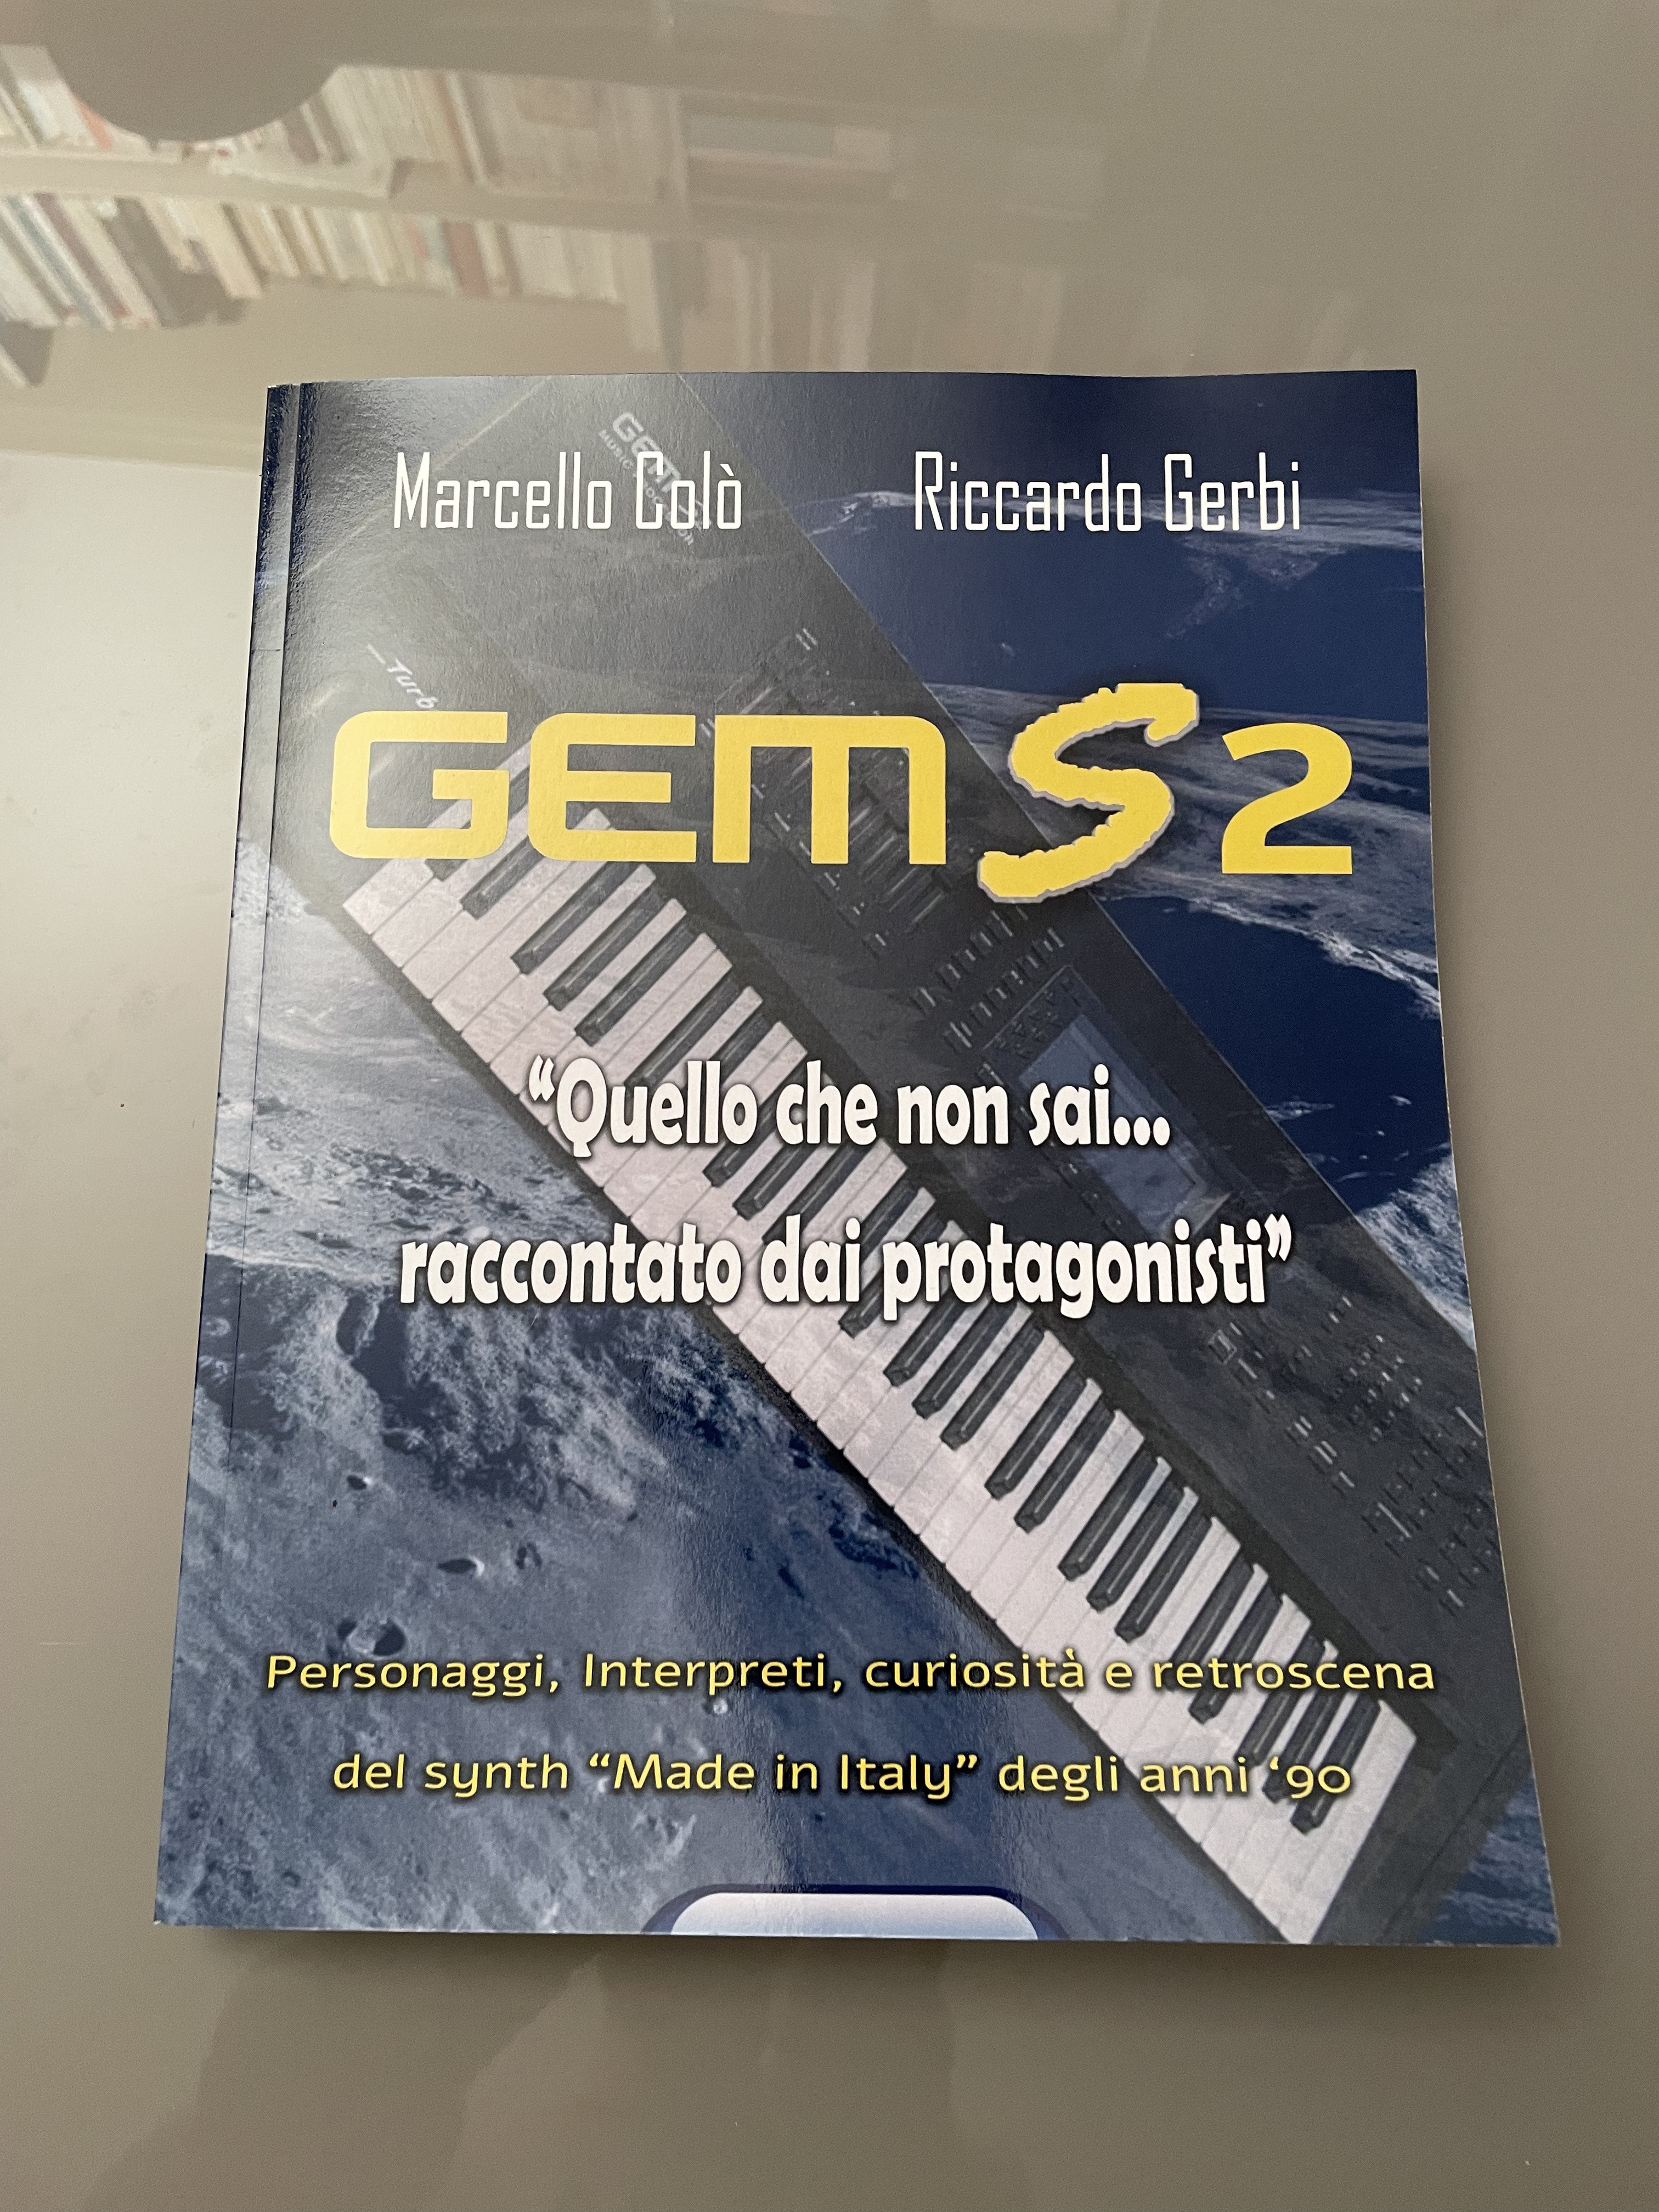
Fig. 5: the GEM S2 book, by Marcello Colò and Riccardo Gerbi
The circuit
I have put on a GitHub project all the KiCad files. The schematic of my version of the circuit is visible in figure 6. It is based on DitroniX's version, and it follows roughly the original GEM Turbokit. I realized a little later in the project that I mis-numbered the address lines. Address line A0 in my schematic corresponds to A1 in the GEM schematic, line A1 corresponds to A2 and so on. I followed the numbering of the EPROM address lines and not those of the processor! That works, but when wiring connector 1 on the processor board of the S2, one has to keep in mind that you have to connect A21, on the S2 side, to the A20 on my Turbokit and the A20 to A19. I followed, however, the same connections on the connector suggested by the original Turbokit, so nothing changes in the installation procedure, after all.
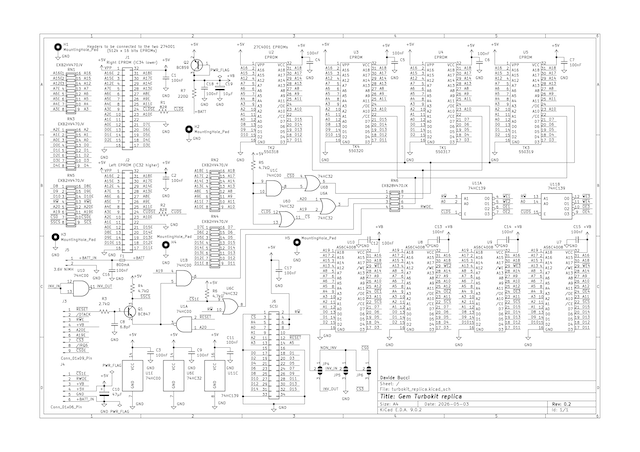
Fig. 6: the schematics of my version of the circuit, drawn in KiCad
My circuit still has some quirks that were present in the original Turbokit. For instance, the connection of the NAND U1C with the two inputs tied together and held at 5V by R5, a pull-up resistor, is strange, unless you had a logic gate to spare. The function of Q1 is also a hack, probably to spare a few logic gates.
I implemented the simple charge circuit for the rechargeable battery that was used in the original Turbokit instead of the much more refined version by DitroniX. A leaky NiCd battery was the source of the death of countless S2/S3 Turbo synthesizers since it was originally installed on the processor board. In my case, I put a NiMh pack far from where it could create damage (figure 22).
I routed a 4-layer board with stack PWR/signal/signal/GND, that is a little unusual. Figures 7 to 10 show the layout of the four copper layers of version 1.0 of the board.
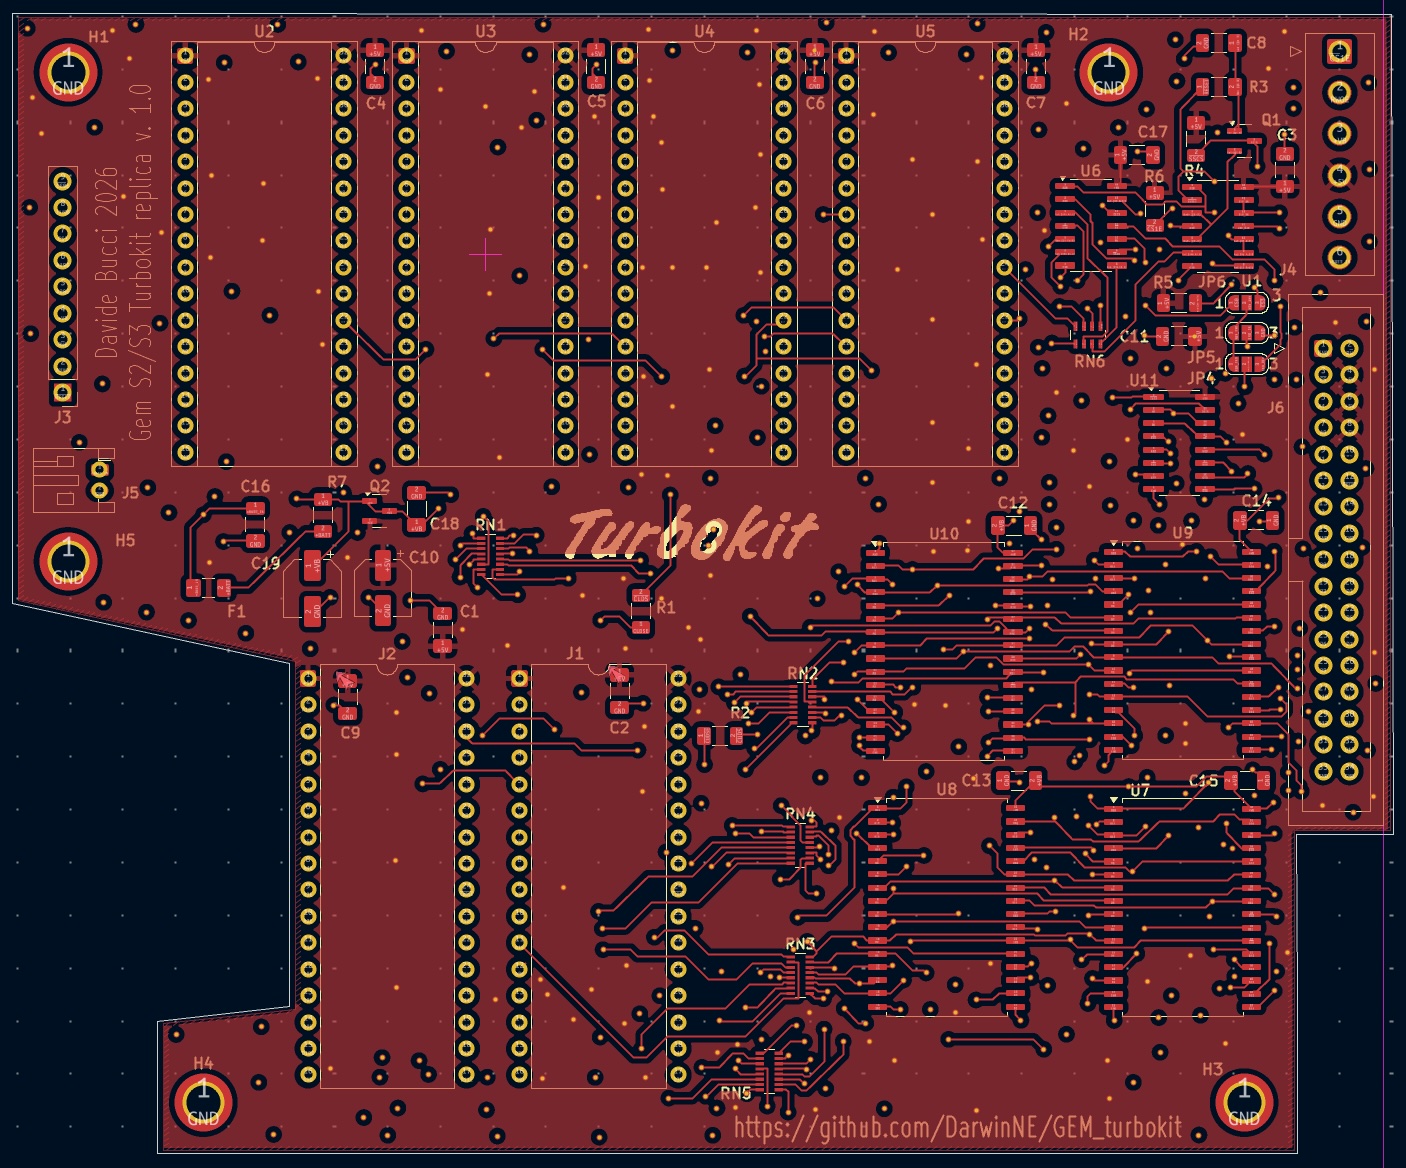
Fig. 7: the front copper layer of the PCB
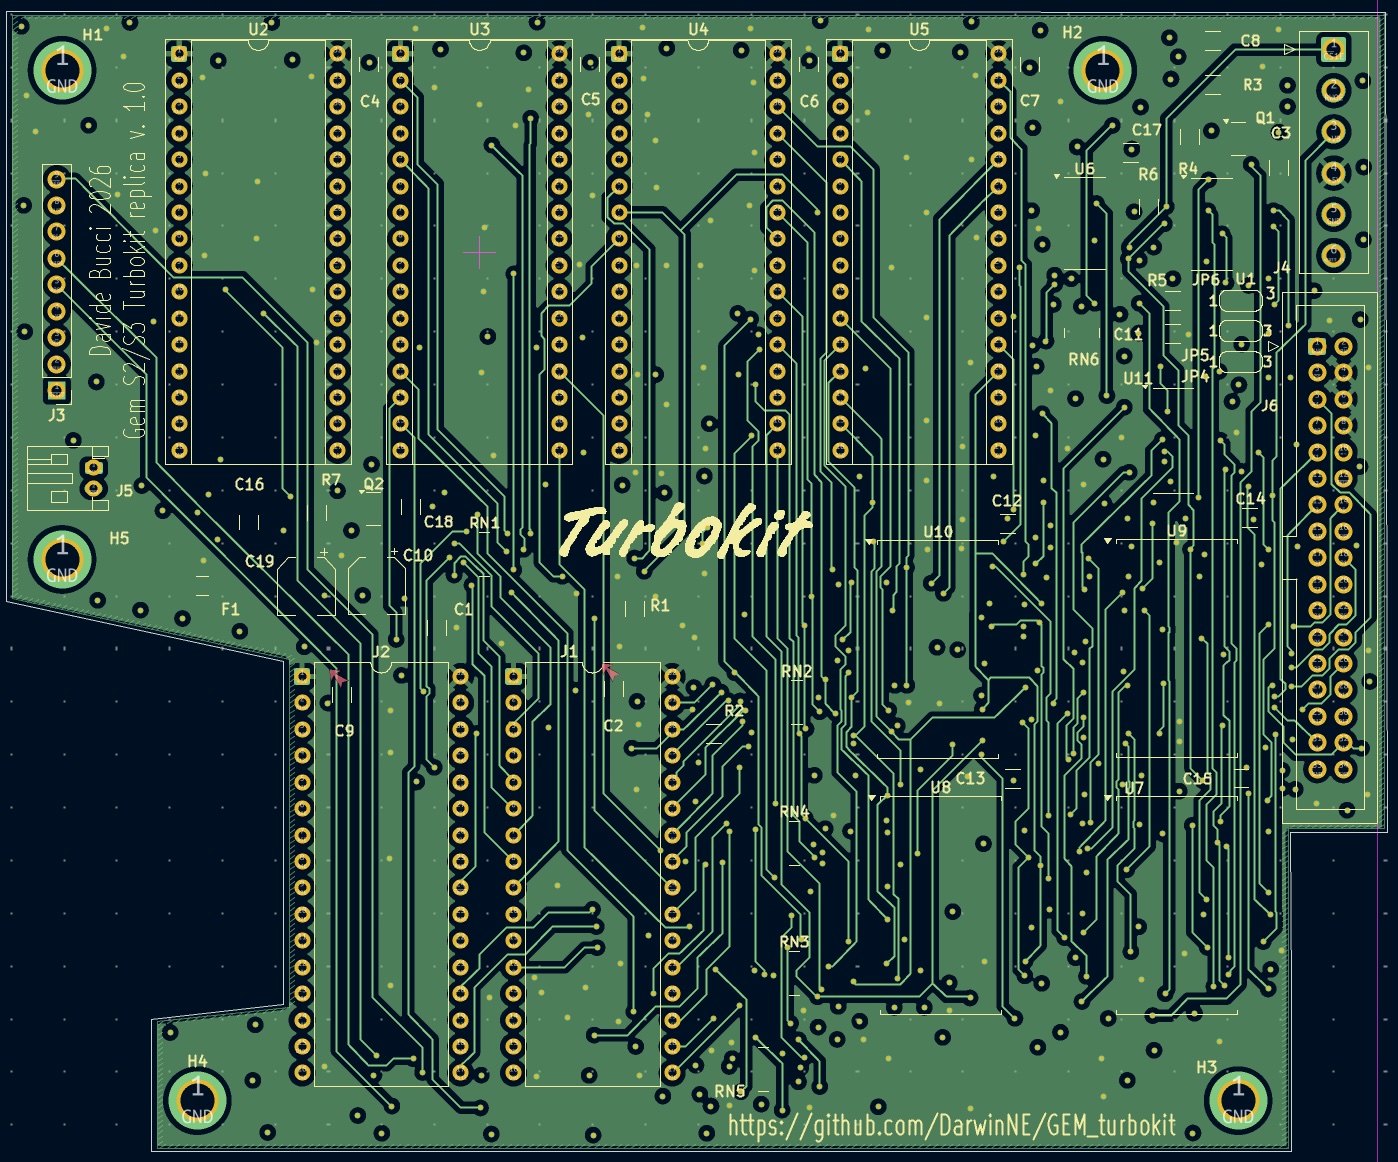
Fig. 8: the first internal copper layer of the PCB
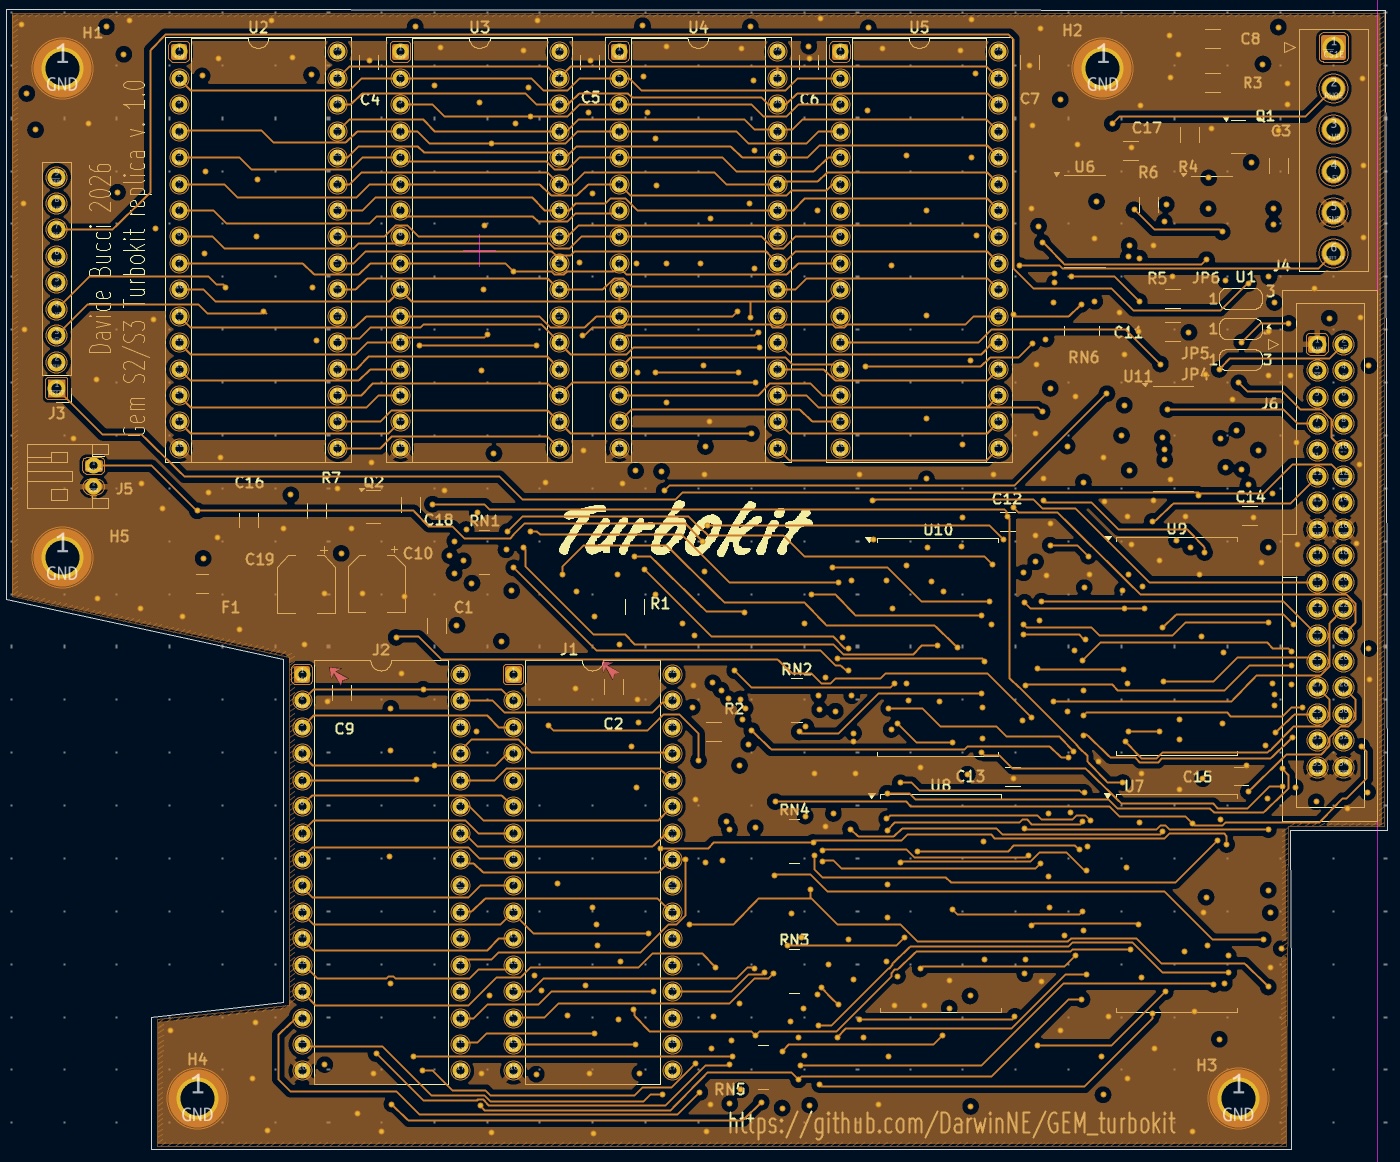
Fig. 9: the second internal copper layer of the PCB
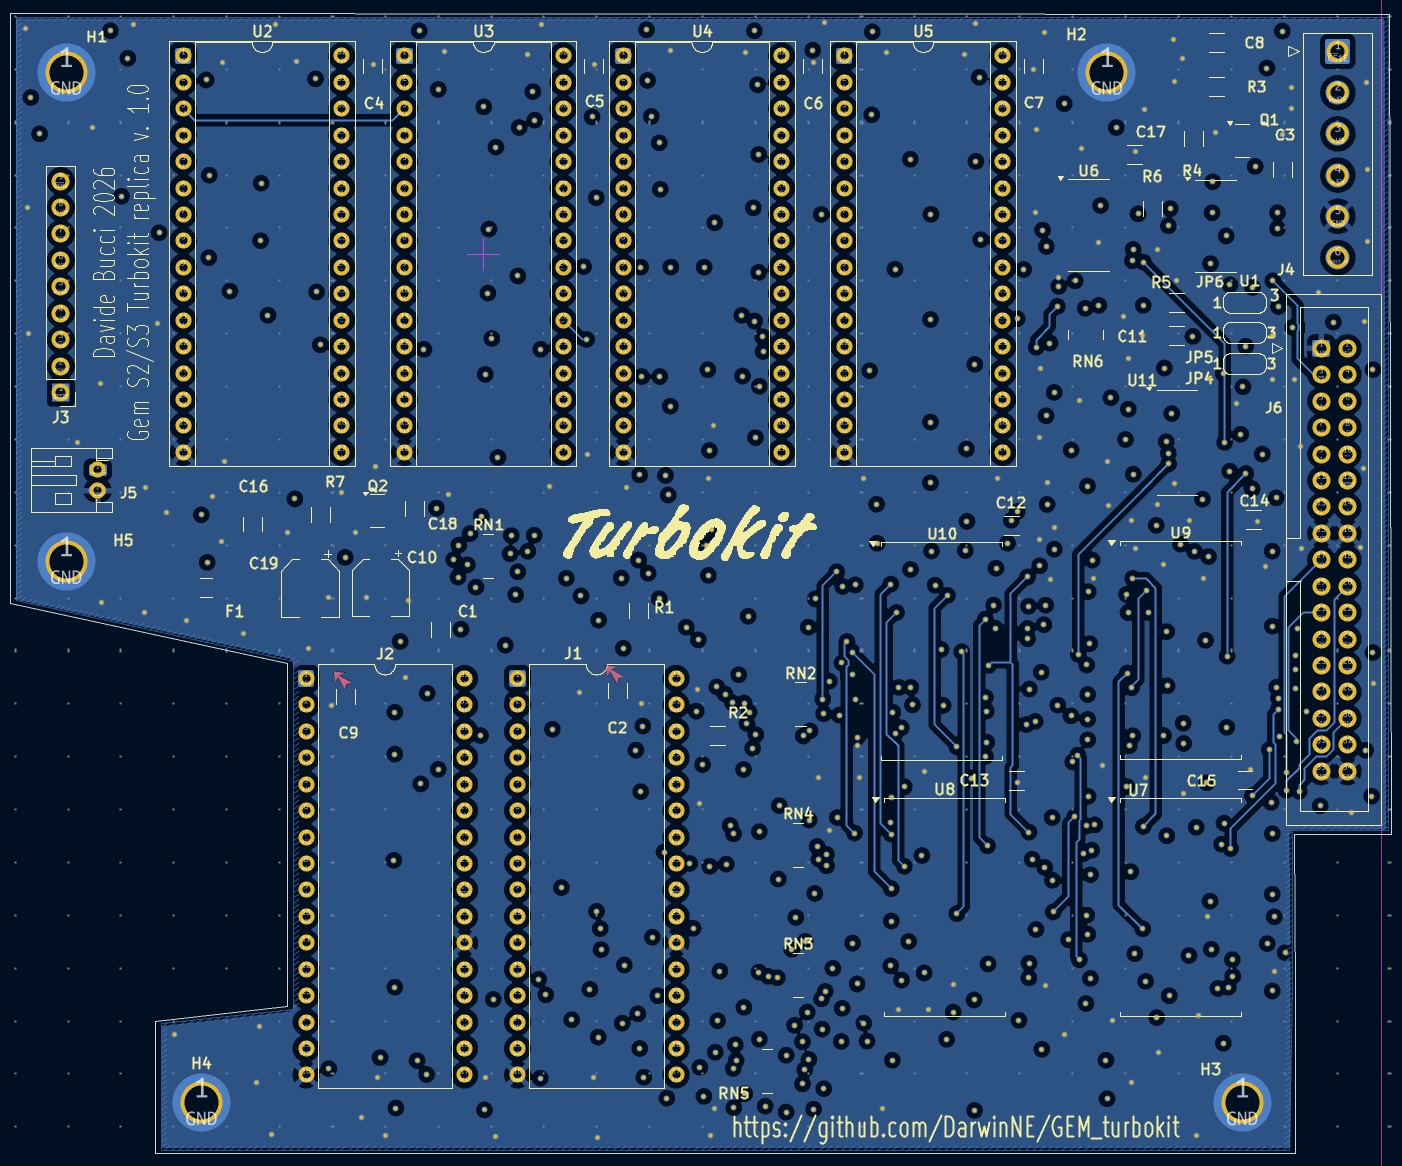
Fig. 10: the back copper layer of the PCB
I have experience in hand-soldering SMD devices, so I did not hesitate to use them in the project. I have to say, however, that soldering them was a challenge. I used five 0402x8 resistor networks (EXB2HV470JV from Panasonic). Soldering them was difficult! I found that the best strategy is to put a liberal amount of flux, pre-tin the soldering pad on the PCB, position the component then heat everything with hot air. For a (lucky?) error, the 4x resistance network is slightly larger 1206 package and soldering it was simpler. Figures 11 and 12 show the complete circuit, ready to be installed.
I had to correct the solder joints a certain number of times. I still have to improve my soldering technique with the smaller packages. This is the main reason why I do not suggest building my version of the circuit if you are not well at ease with such problems, and you know how to take them into account.
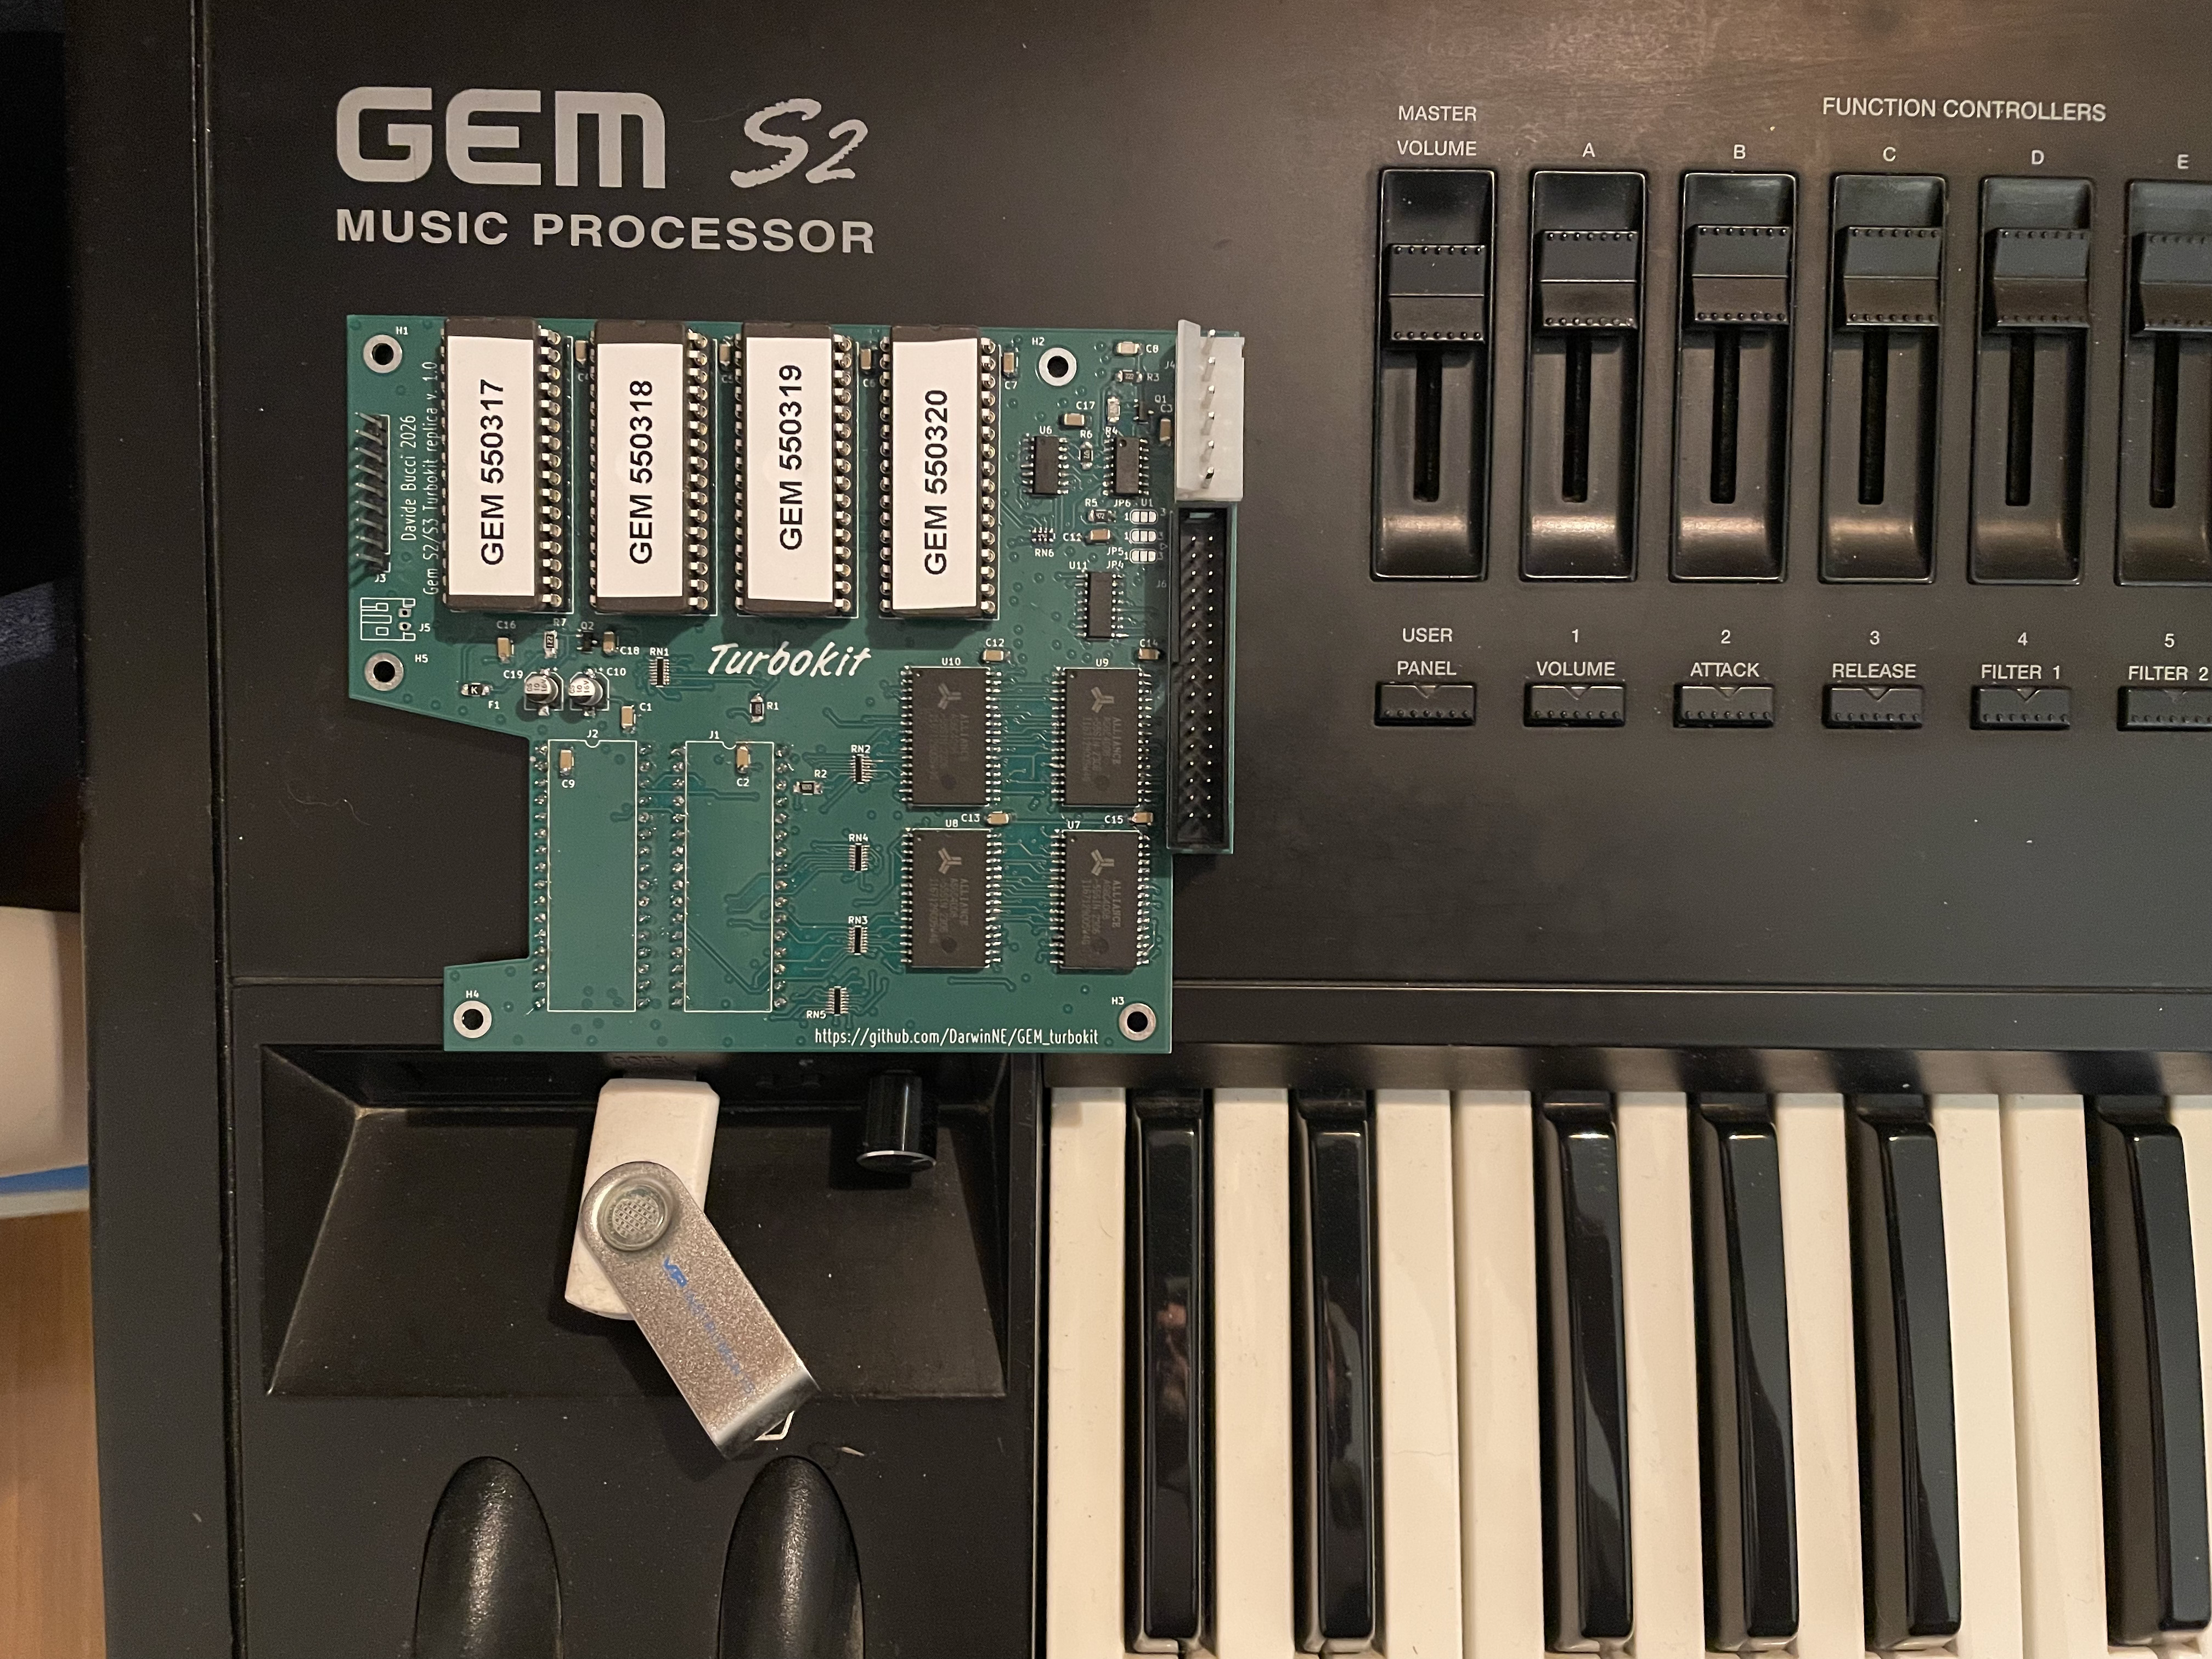
Fig. 11: the Turbokit assembled, ready to be installed in the S2
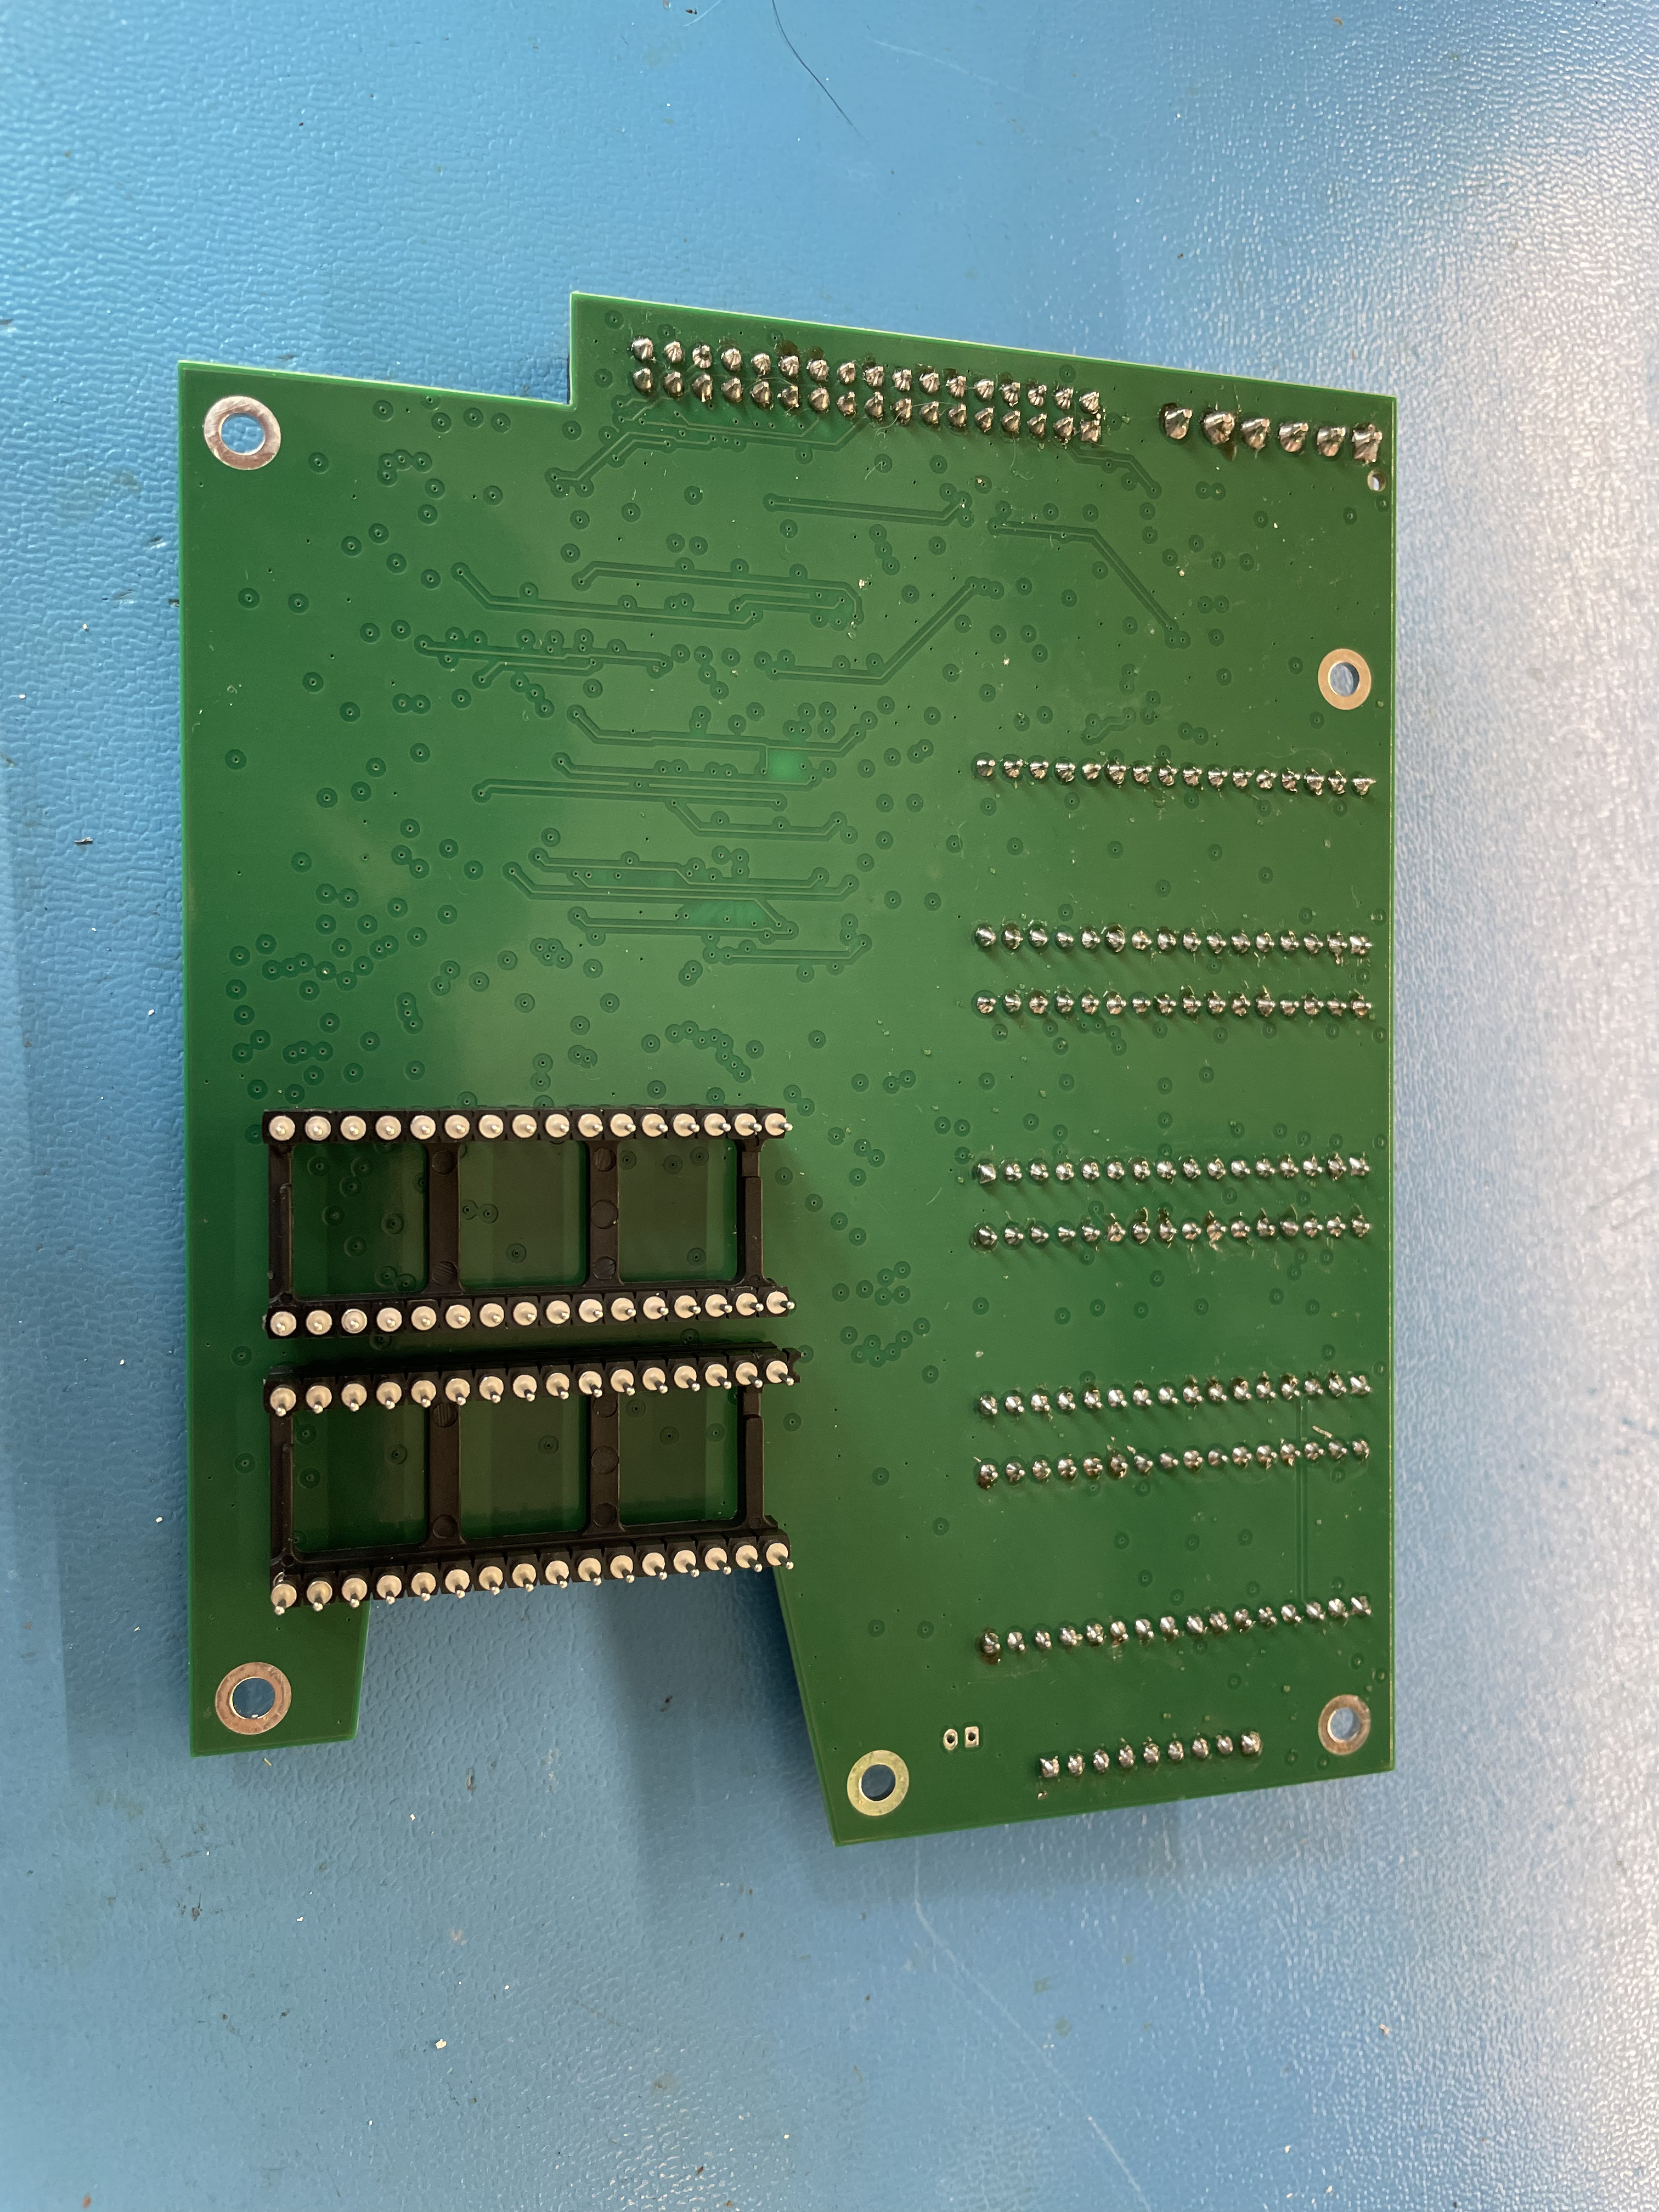
Fig. 12: the back side of the Turbokit, with the connectors for the original EPROM sockets
Inspired by DitroniX's solution, I tried to find a way to have the Turbokit PCB plugged directly inside the sockets of the original EPROMs. I used a pair of sockets mounted on the back of the PCB, coupled with precision pin headers, machined, visible in figure 12. They are slightly larger on one side, firmly kept in place by the EPROM sockets in the S2 processor board. The header pins are slightly larger than the ordinary EPROM ones, therefore I suspect it would not be a good idea to insert and remove them more than once or twice.
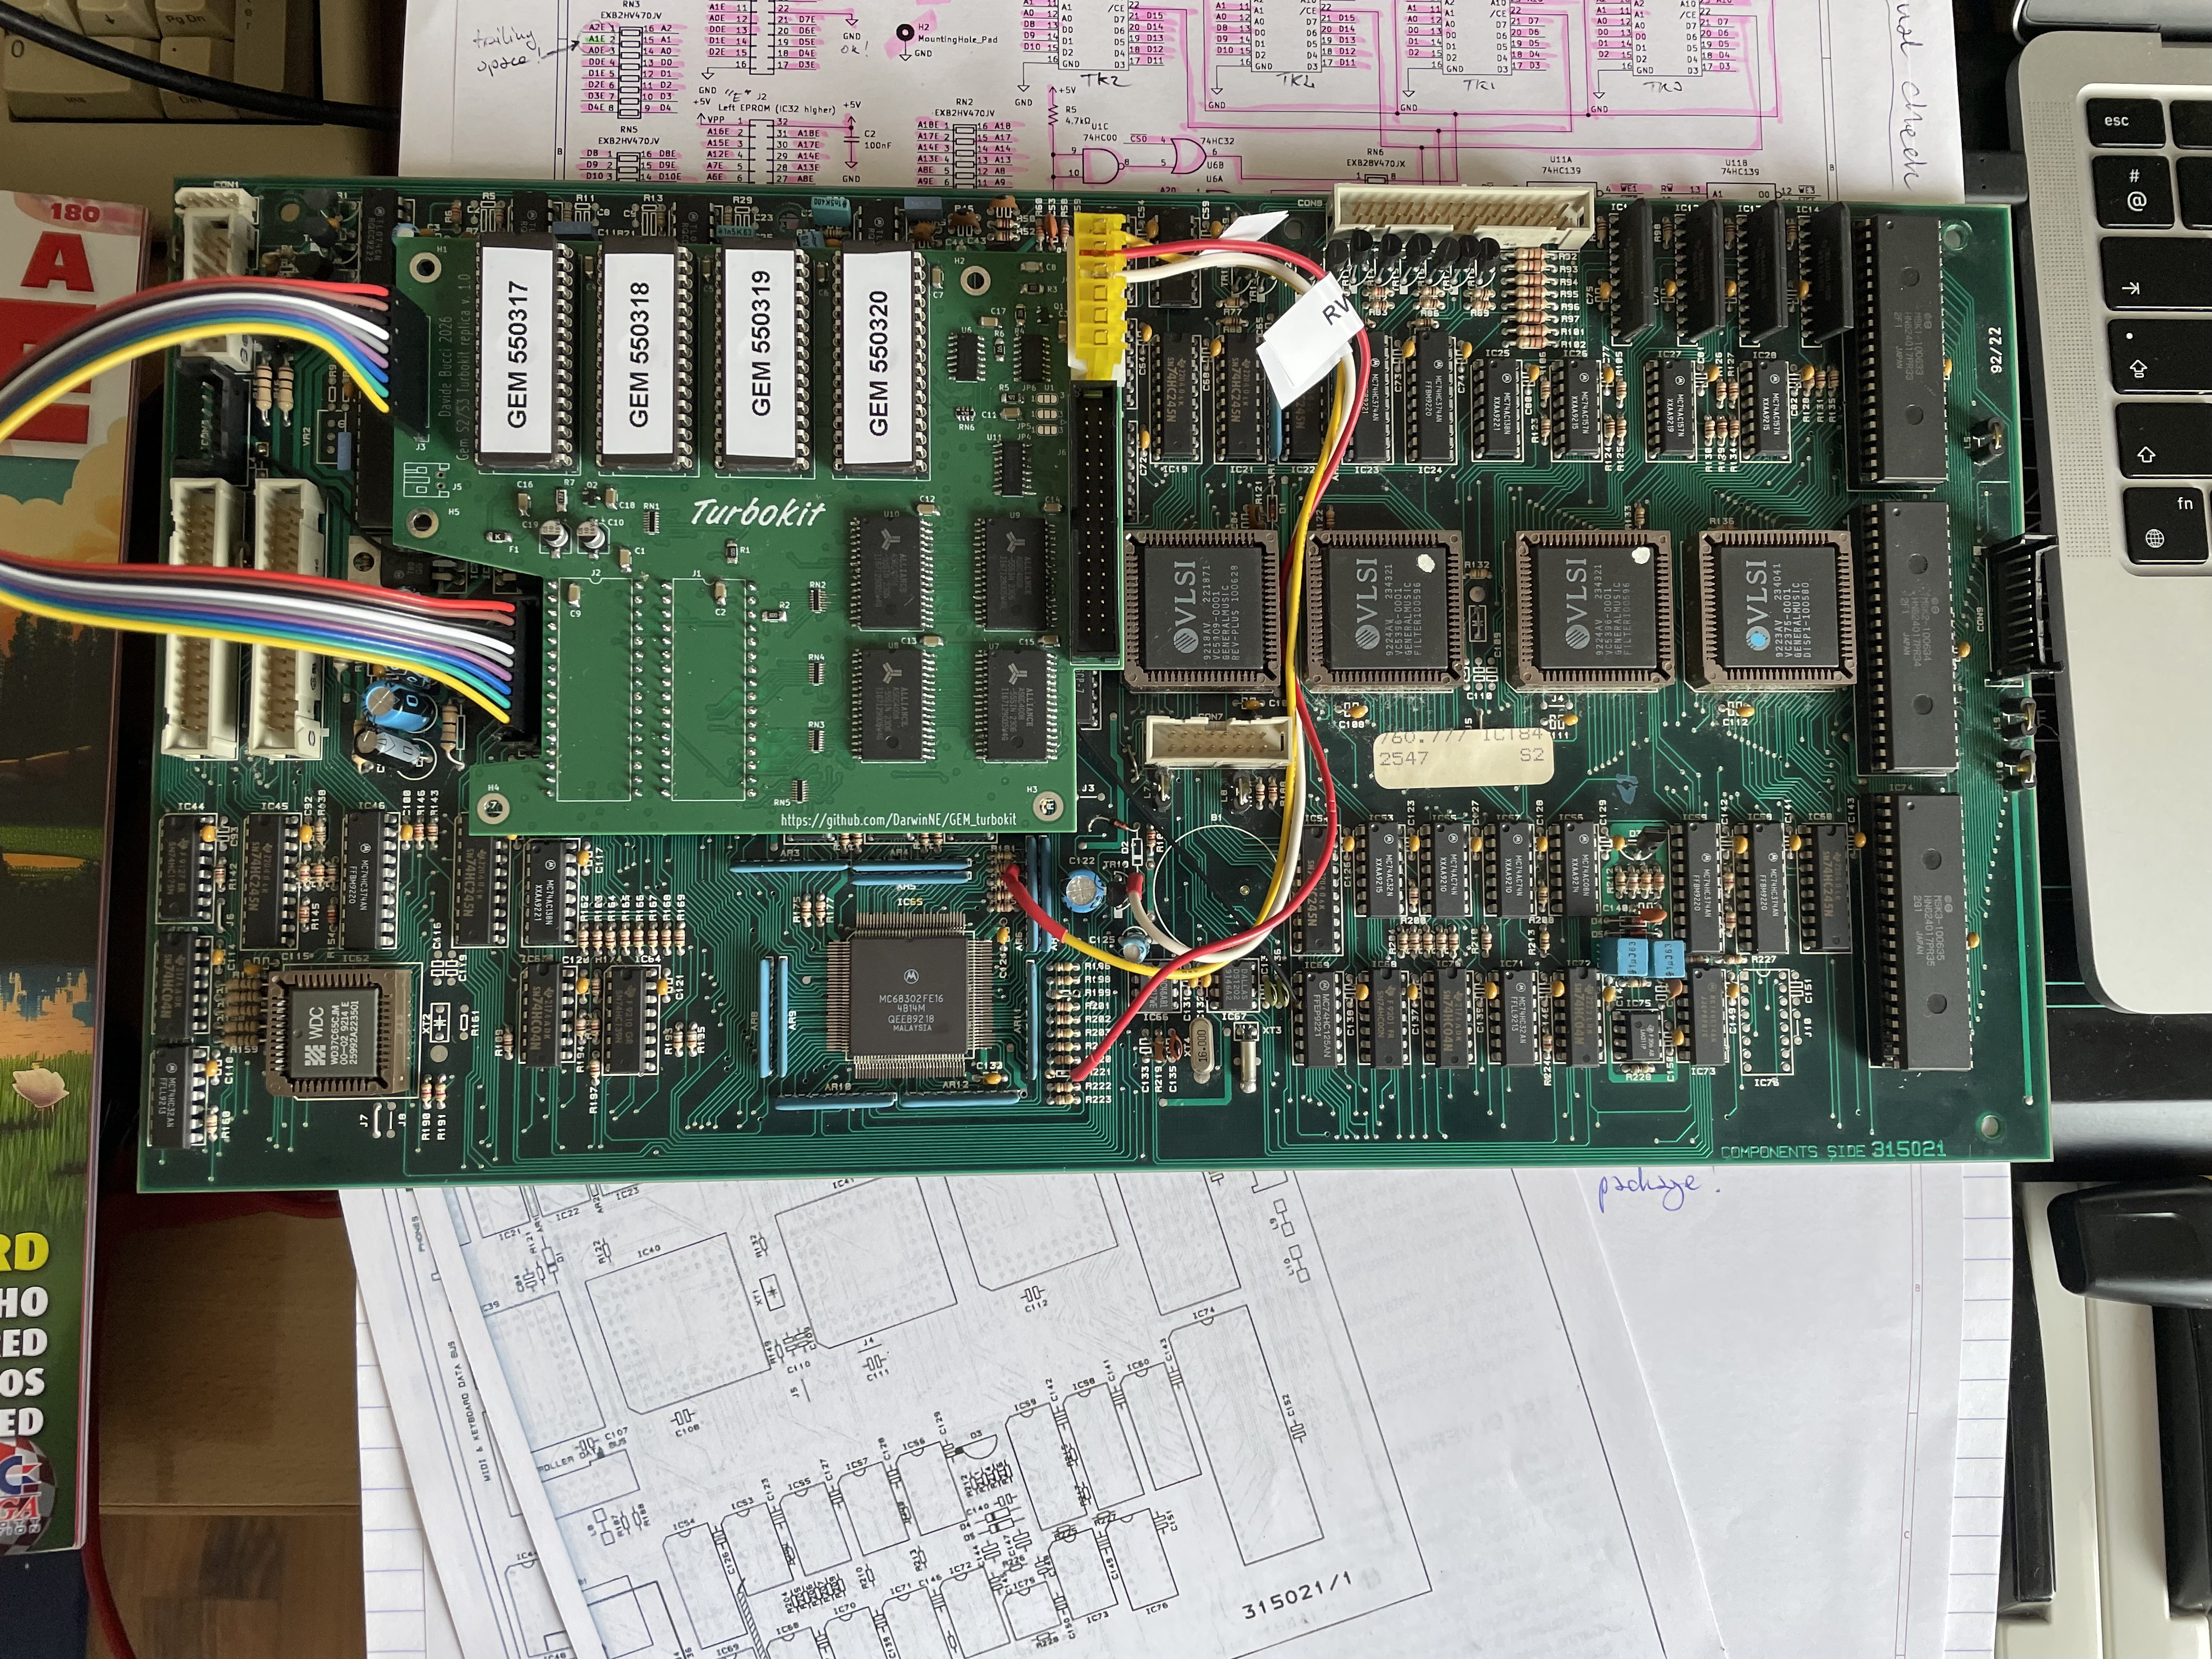
Fig. 13: the Turbokit installed on the processor board of the S2, already modified but without the NEC µPD72064 chip installed yet. I later put two zip ties to keep the cables neatly in place
The Turbokit requires some modifications to the processor board to be installed, as visible in figure 13. They are described in the original Turbokit install manual. You need to cut two traces near the connector CON6 (probably it was a diagnostic connector repurposed for the Turbokit) and add wires to bring there the signals /RESET, A20 (that connects on A19 on my circuit), A21 (A20 on my circuit) and CS0. You should remove R199, that is not present in the schematics I have of the processor board, but I found to be in series between the /LDS control line and one pin of the connector J6. The modifications on the back of my board can be seen in figure 14. Note that it is an earlier revision, number 35021 with some factory bodge wires. More recent boards (I think with fewer corrections) sport the code 35021/1.
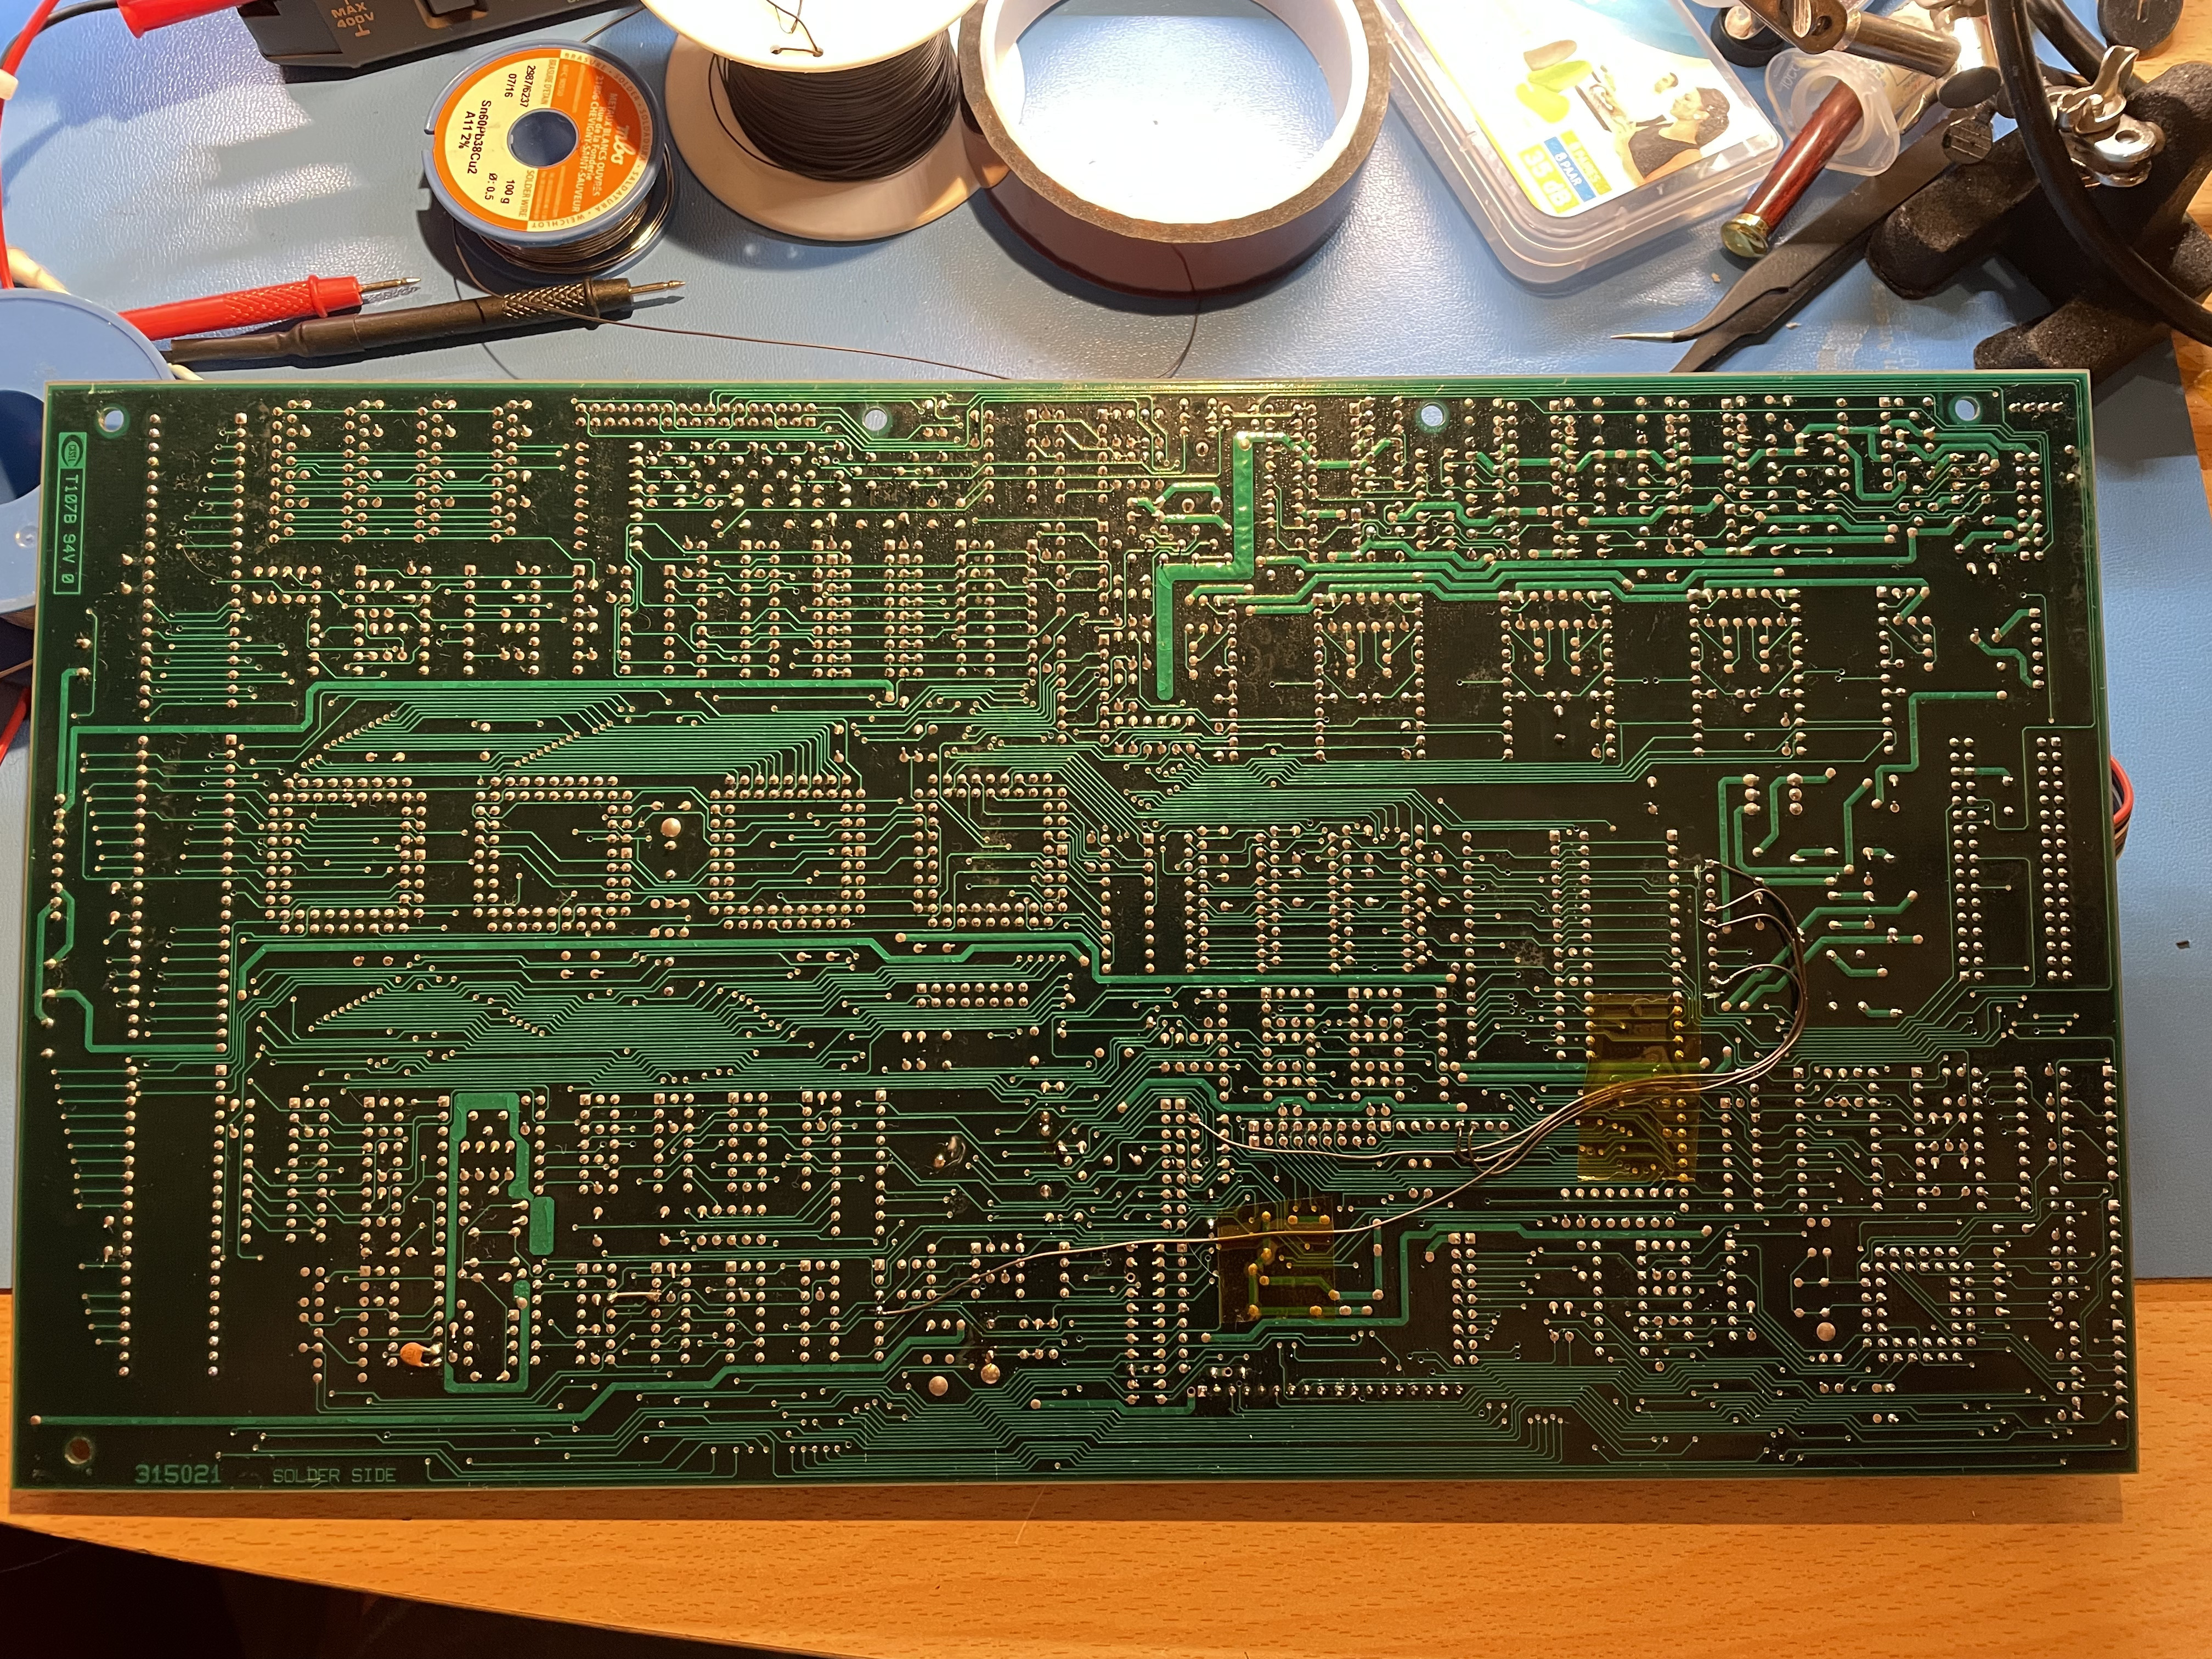
Fig. 14: the back of the modified processor board
You should also remove R221 and connect a wire to one of the terminals where it was connected. This is to break the R/W line between the processor and the onboard RAM, to be controlled by the Turbokit. You have to remove the original lithium battery (mine was in perfect condition and still charged after 34 years!) and lift one terminal of the diode D2 to connect a wire in place. This is to bring the battery voltage to the real-time clock chip on the processor board. I used a rather large MTA .156 IDC connector on the board as they are practical to use, and I have a stock of them I got many years ago. Those changes are visible in figure 15 and the installed board under the keybed is visible in figure 16.
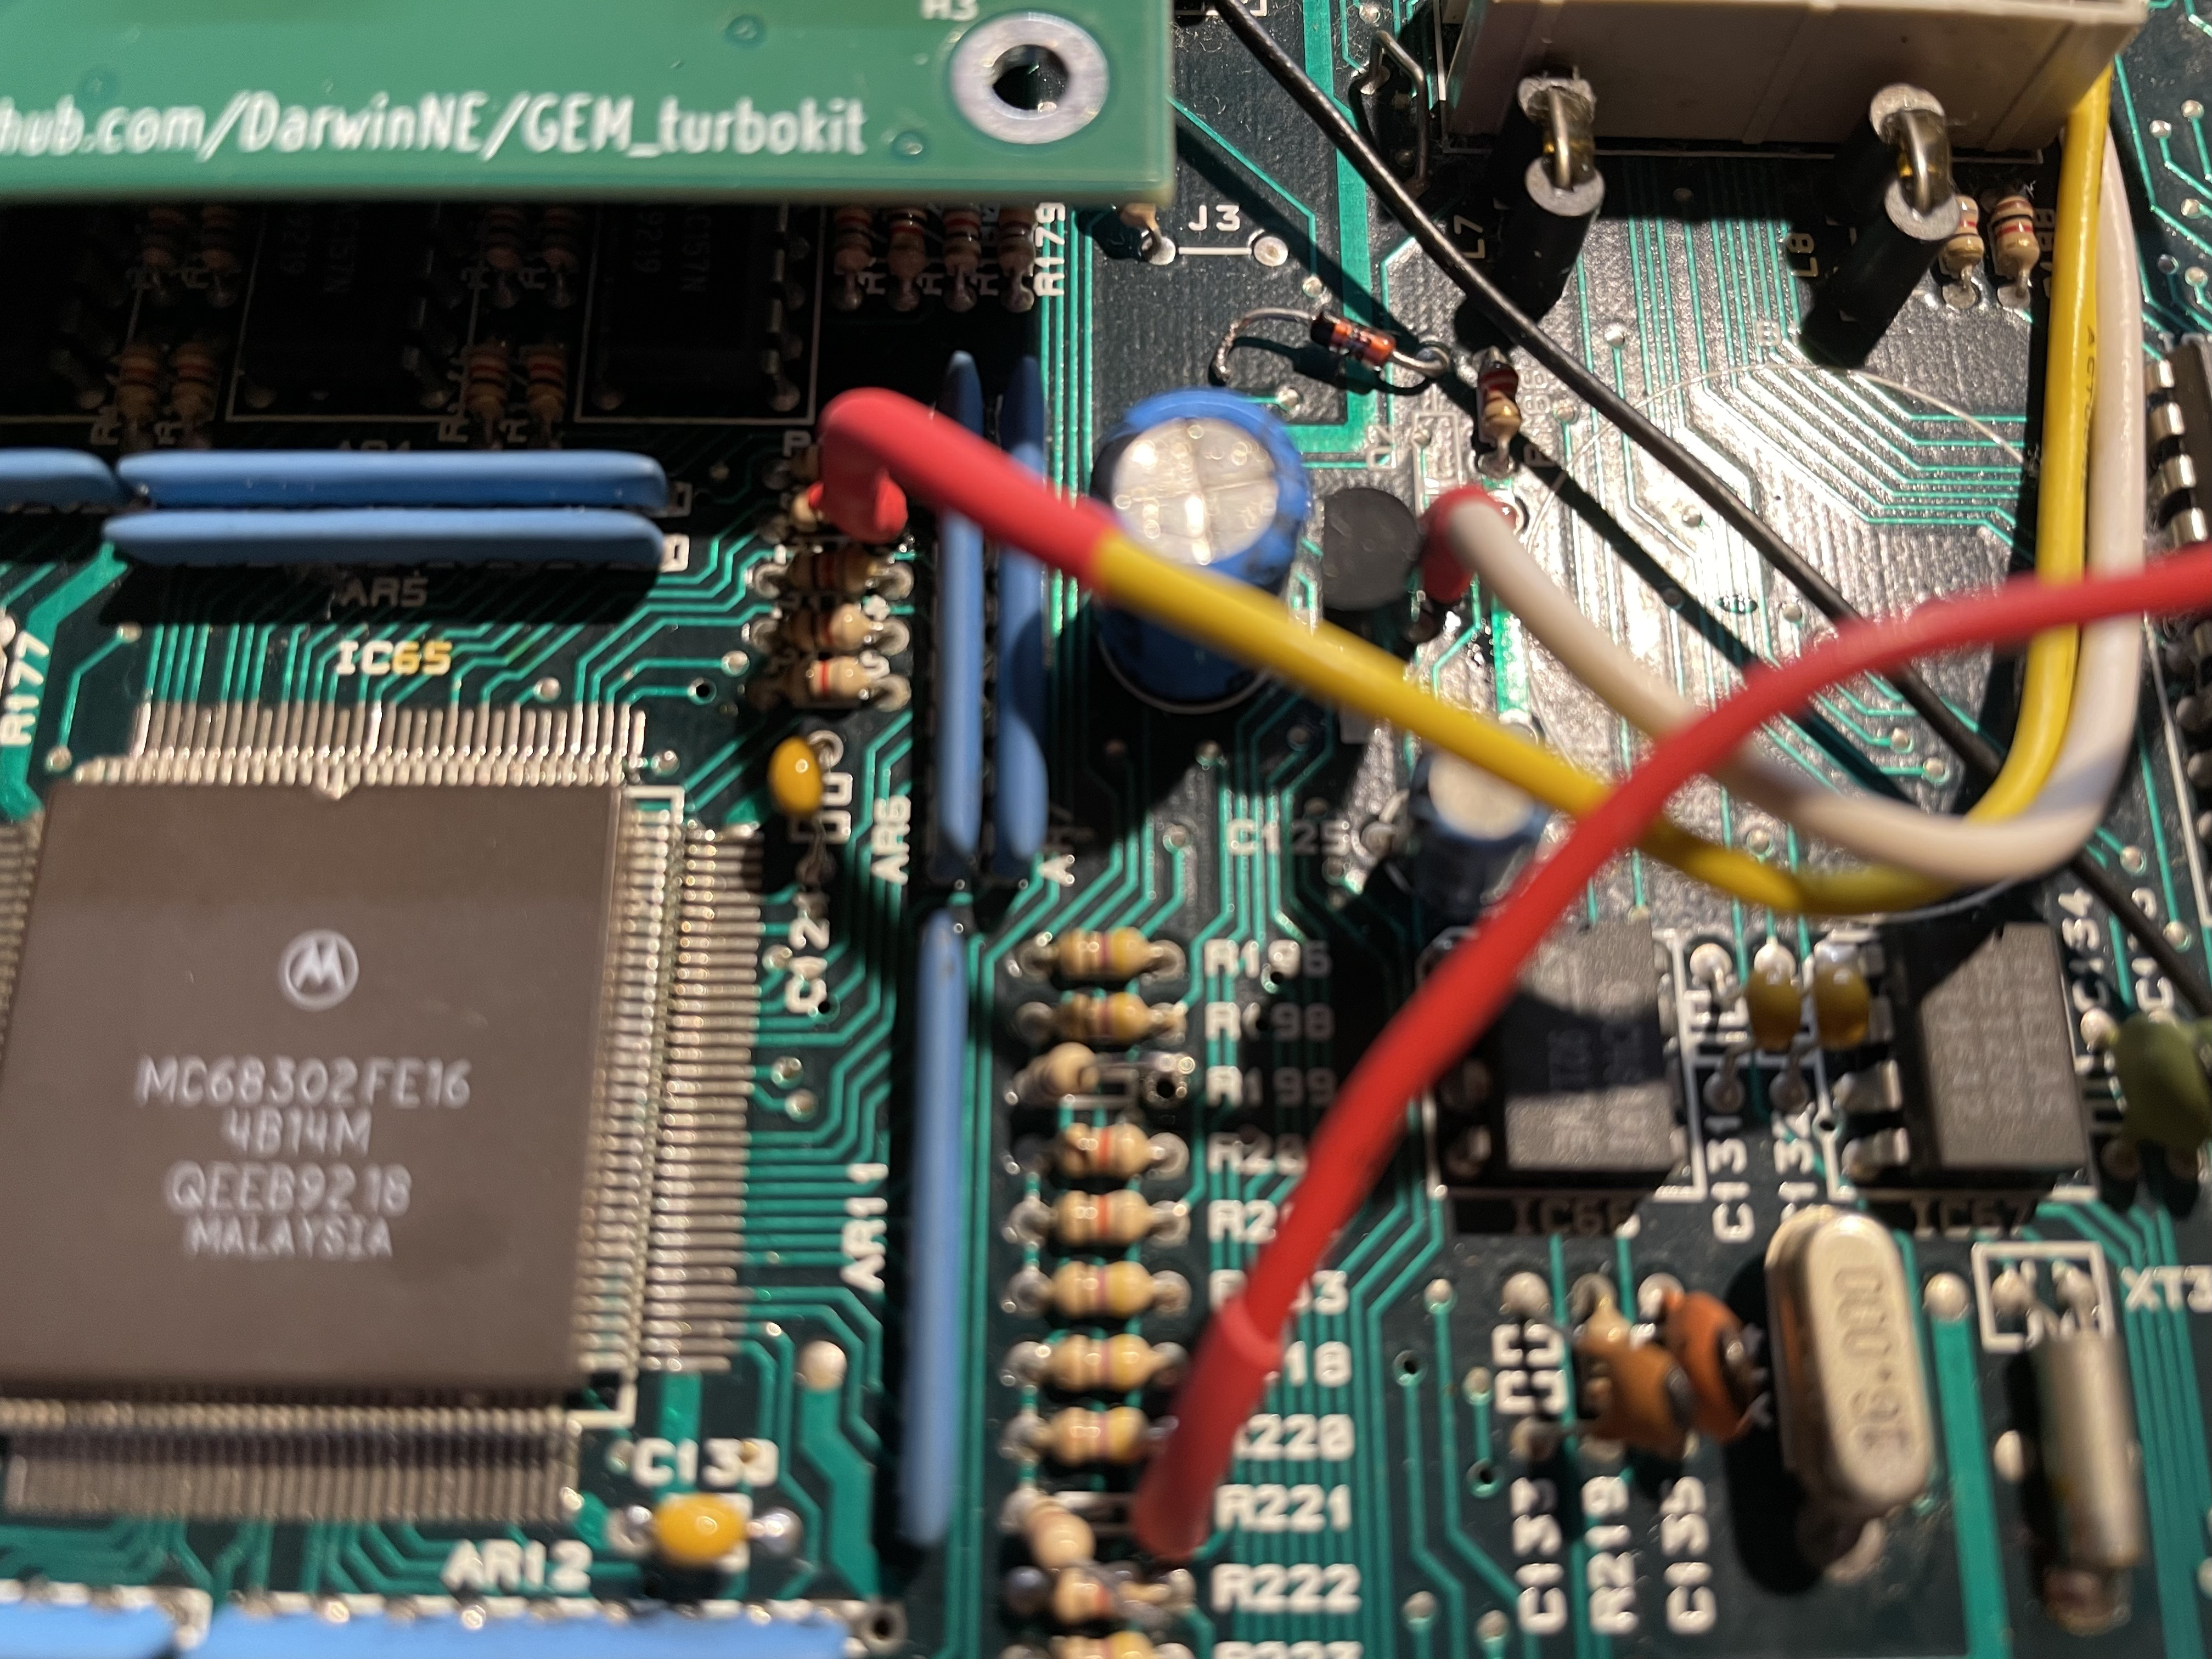
Fig. 15: the changes on the component side of the board, notably around R199, R221 and the battery
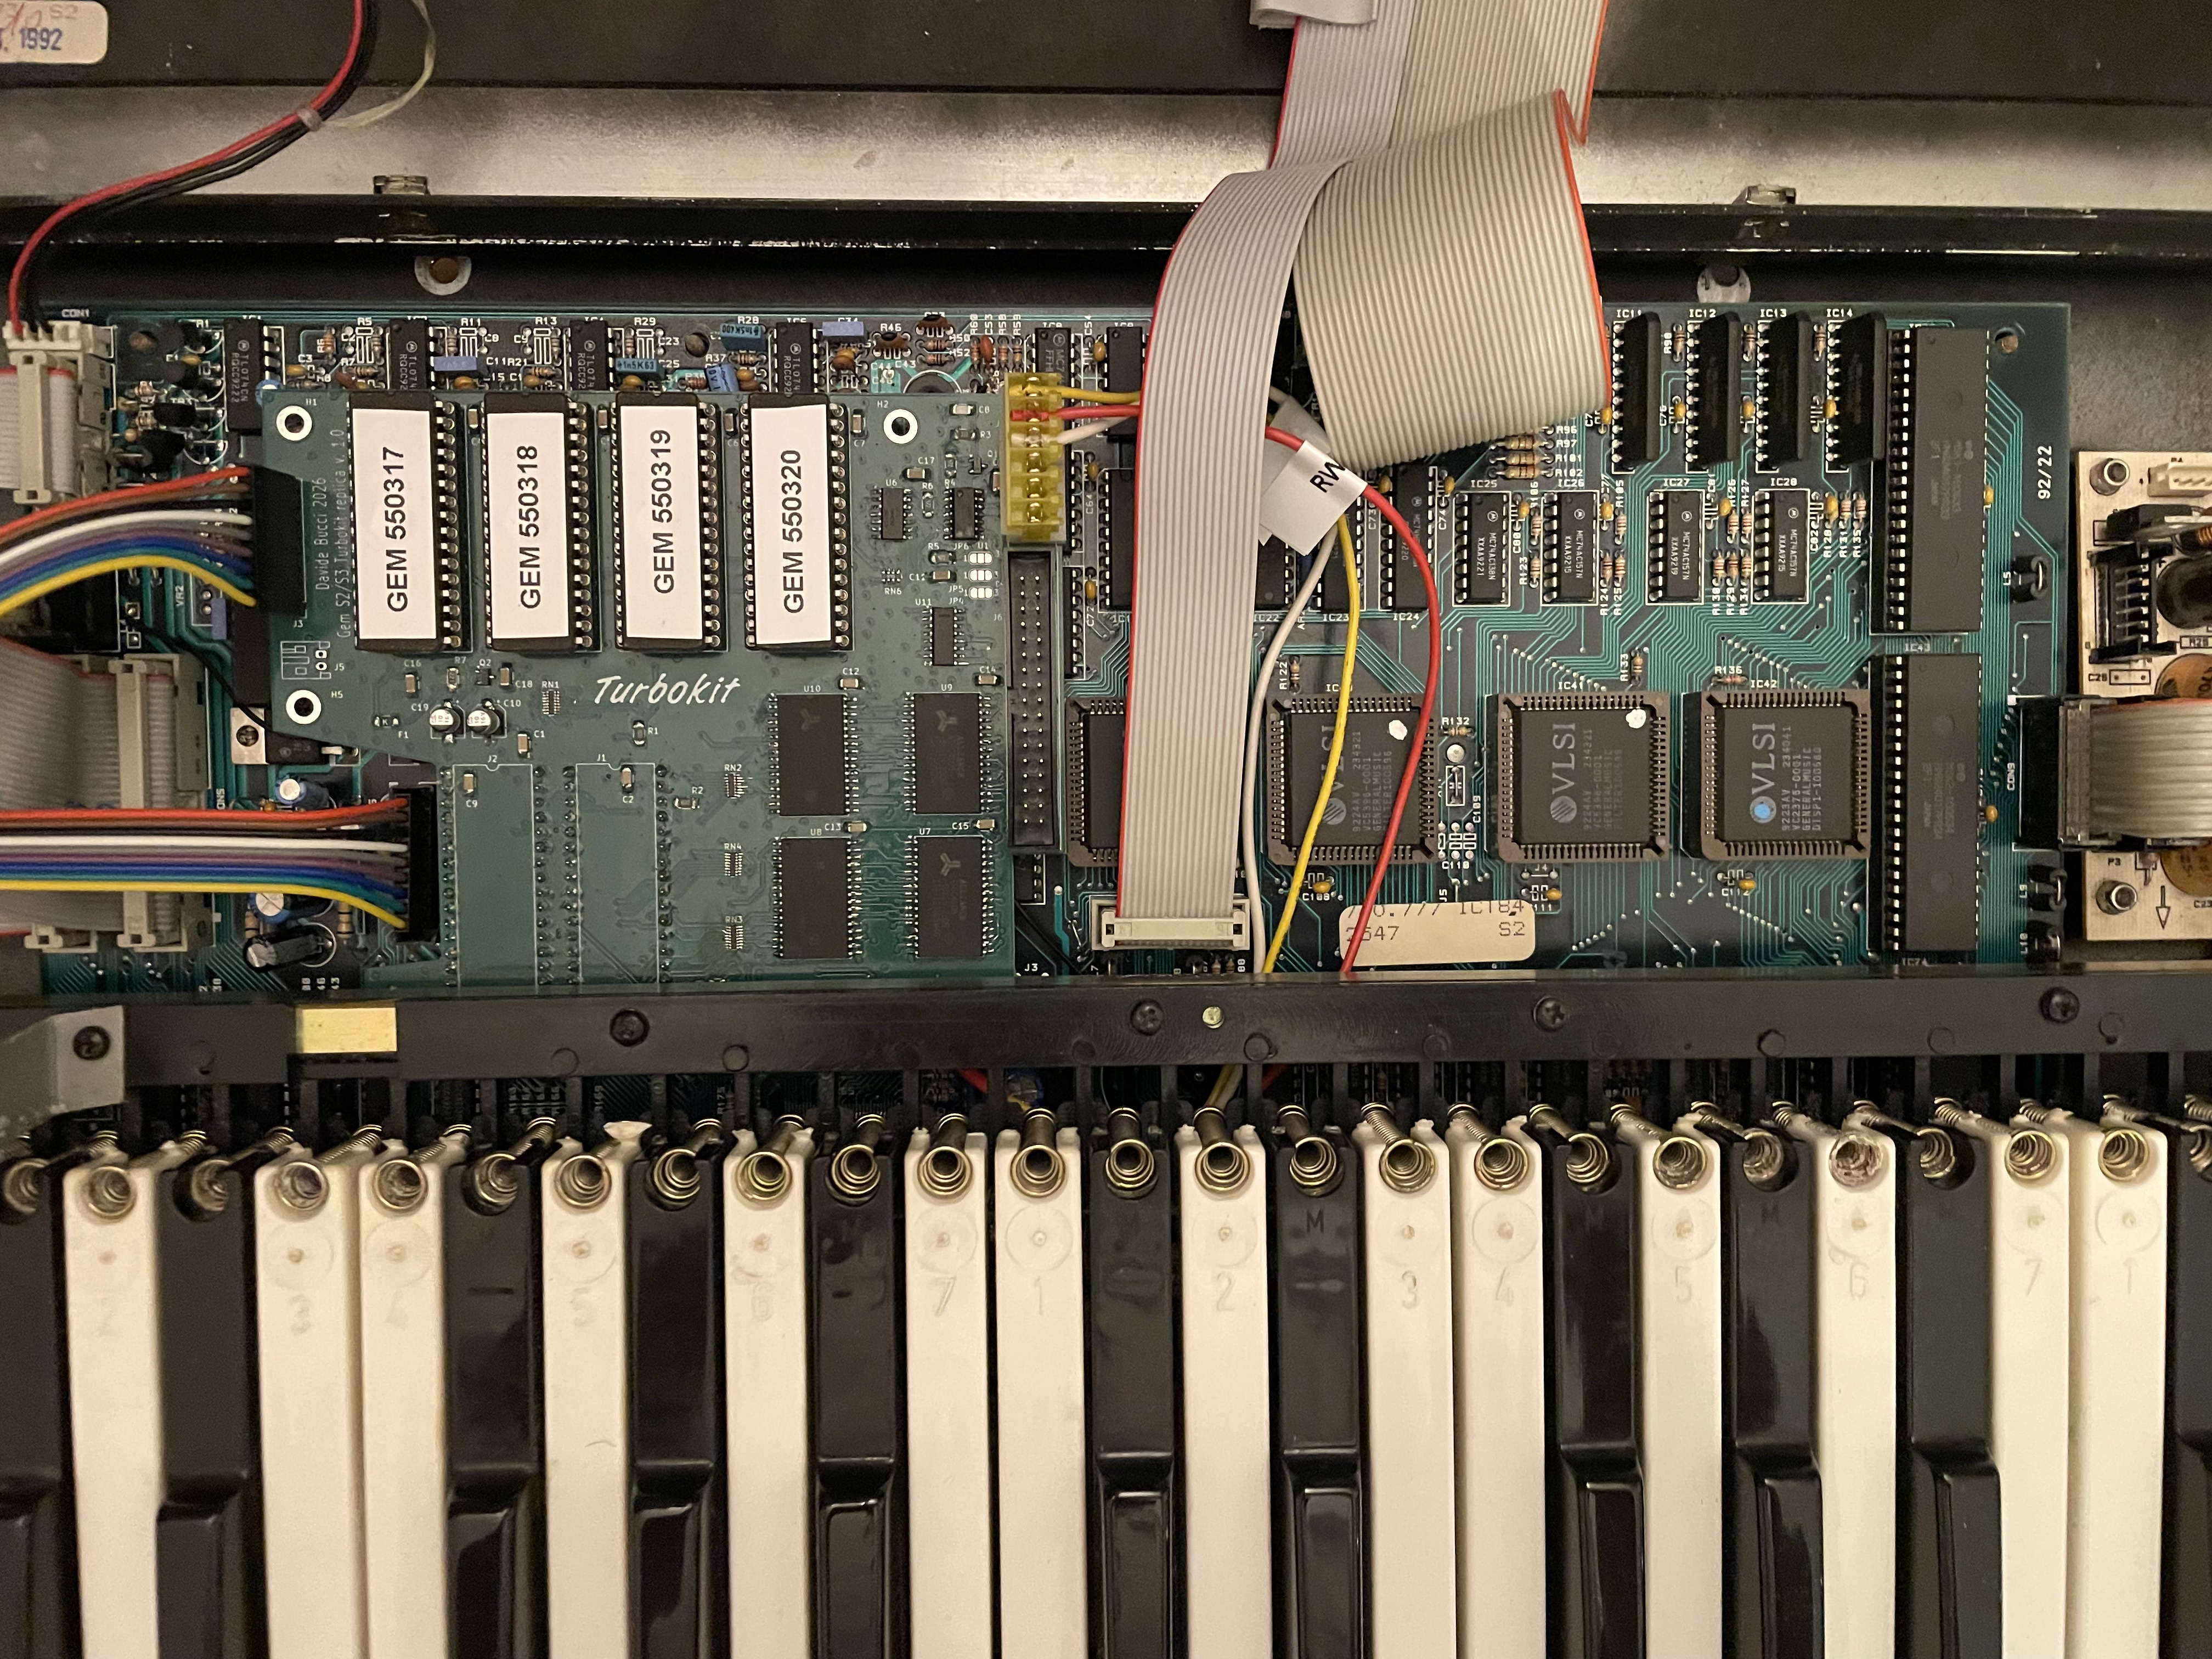
Fig. 16: my version of the Turbokit replica, installed in the keyboard
After a few attempts and corrections to bad solder joints that needed to be reflowed, I was greeted with the S2 Turbo splash screen visible in figure 17. I was very happy! I had waited for this moment for 30 years. I now have a S2 Turbo synthesizer. I love how the choice of the name "Turbo" suggested an improved version of something, like for popular hot hatches. After all, those were the years when you could cross cars such as the Uno Turbo, the Renault Super 5 GT Turbo, the Innocenti De Tomaso Turbo...
EDIT: No electronic project can be successful without at least one bodge wire! I had to remove the resistance R4 and connect the lower terminal terminals to the power supply of the SRAM via a 4.7kΩ resistor. See figure 21.
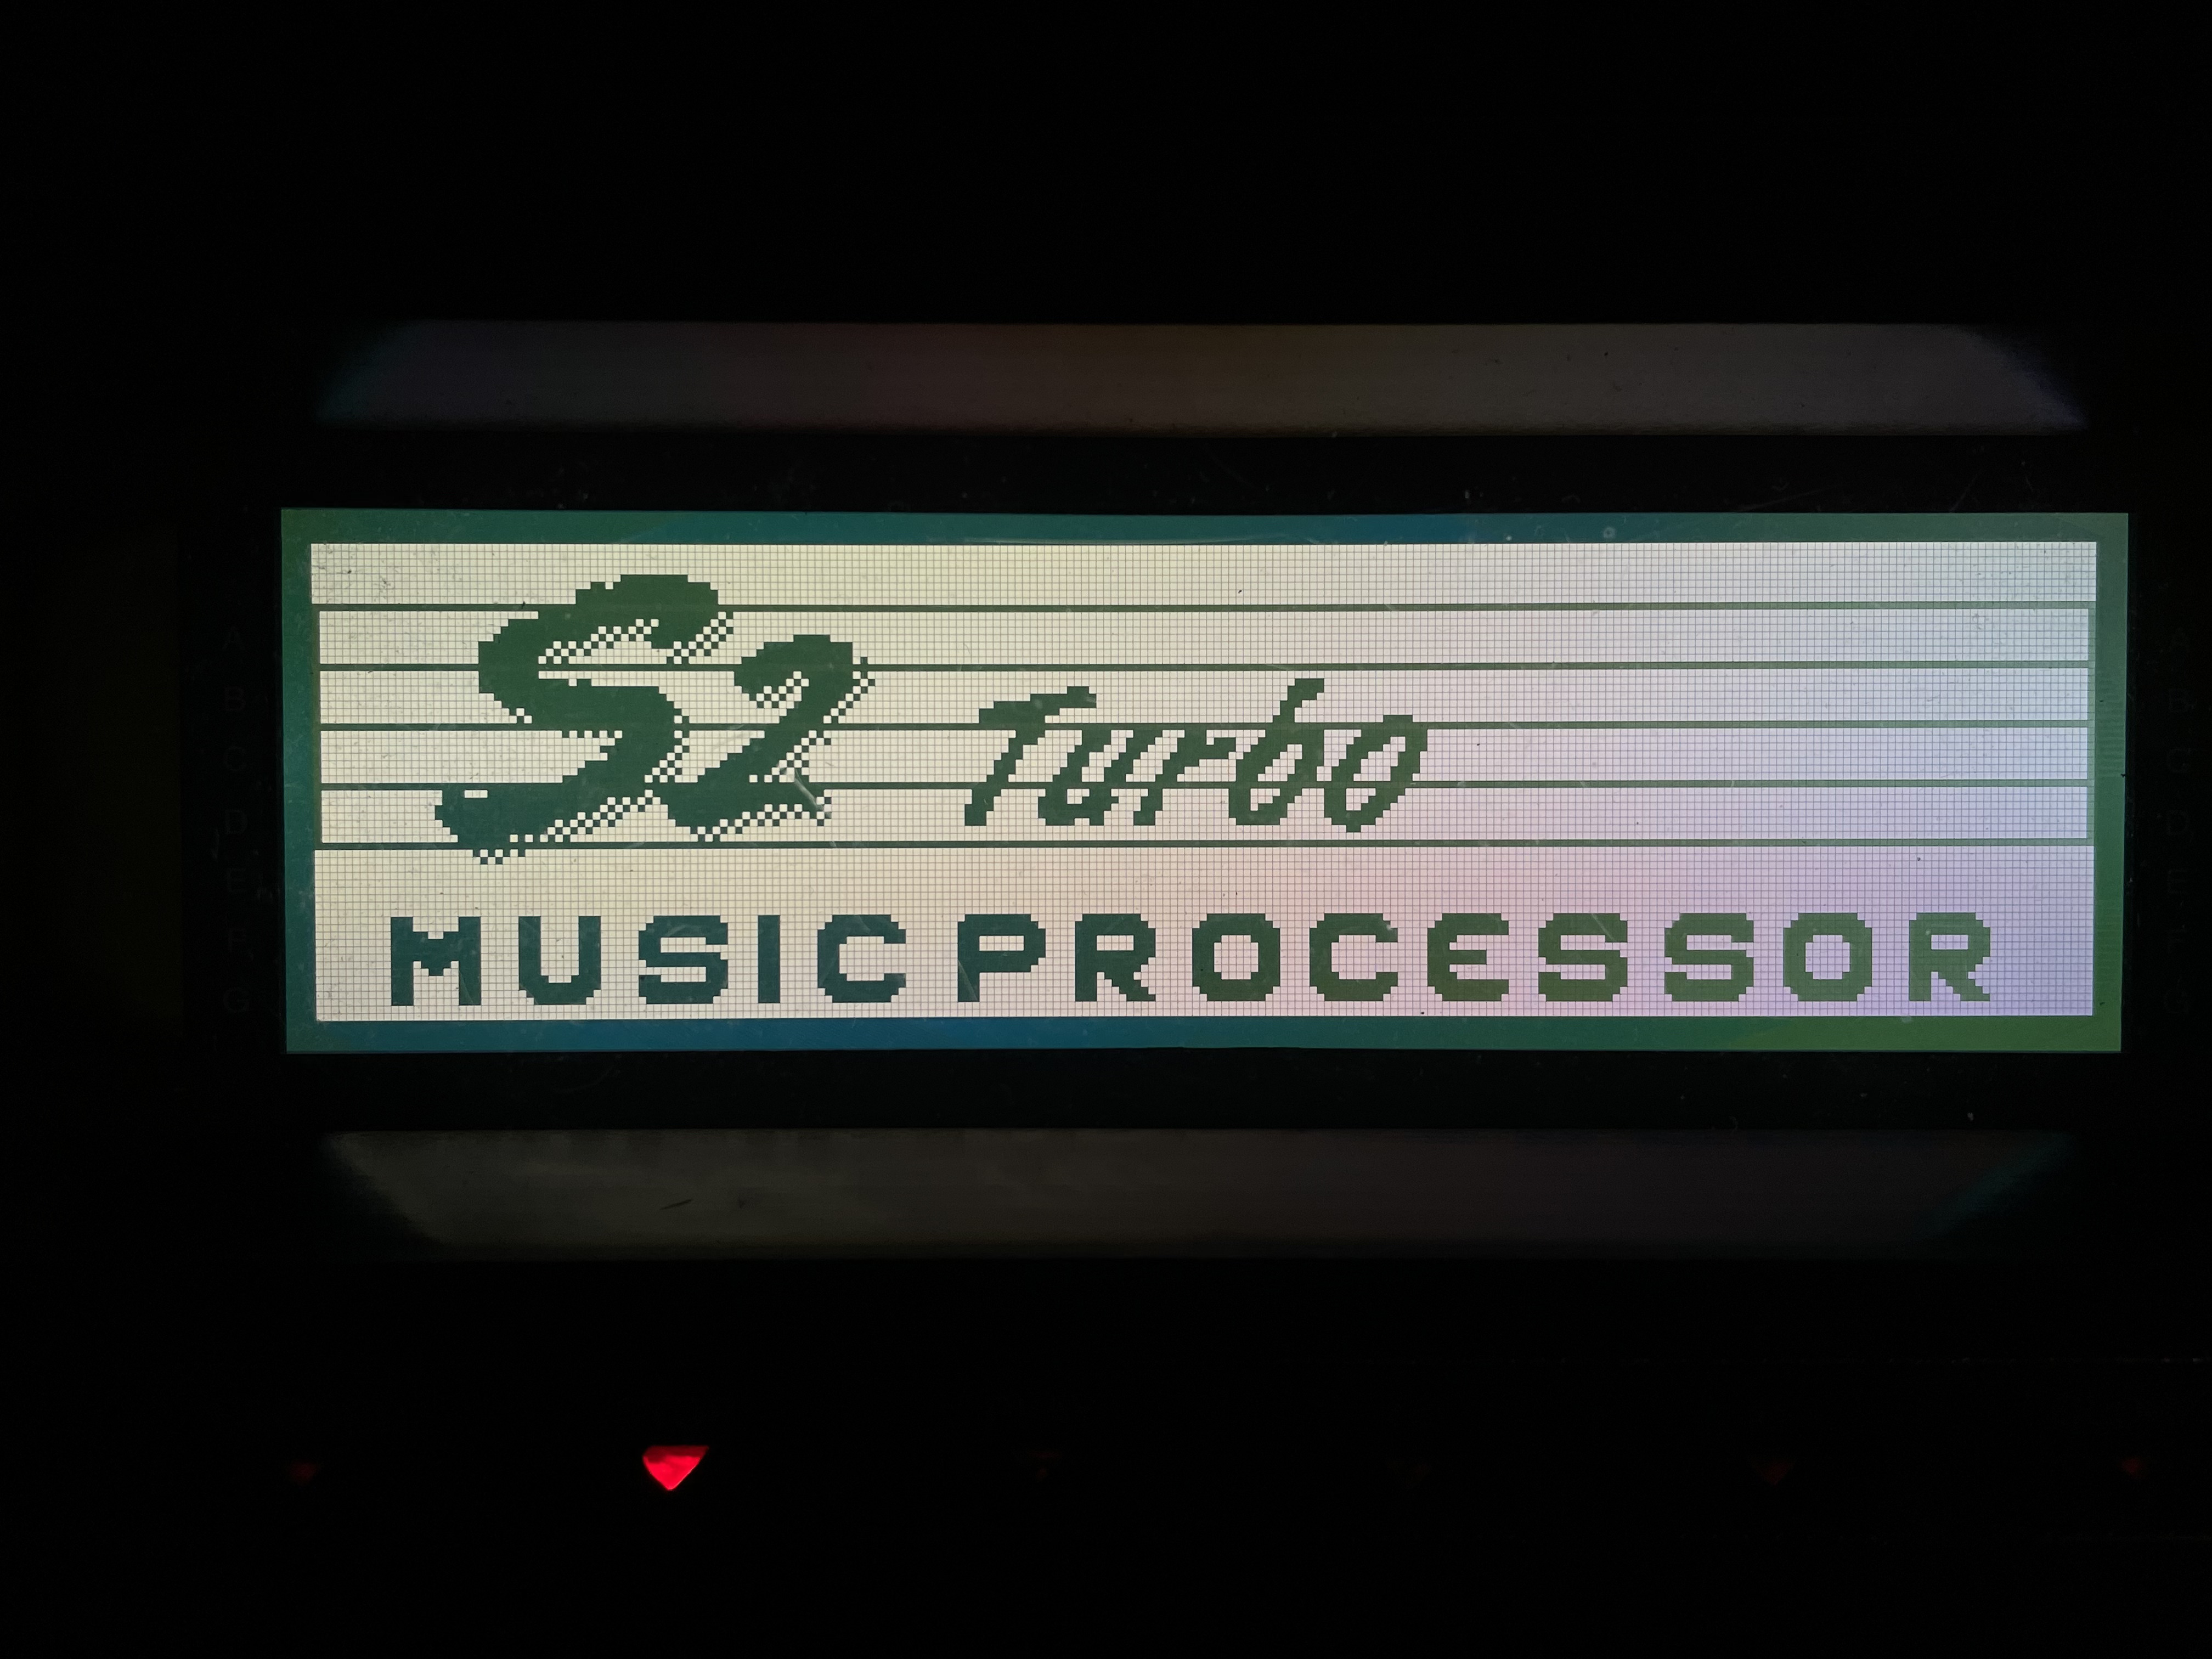
Fig. 17: the splash screen now proudly declare that my S2 is a Turbo version!

Fig. 18: the "new" performance view. Compare this with the screen of figure 1
Another important change required in the processor board, less dramatic yet important, is the upgrade of the disk drive controller chip from the WD37C65C to the more advanced NEC µPD72064. The synth's PCB could use it by installing a 32MHz quartz, two capacitors and a resistor and by cutting a jumper. This is used to allow the S2 to read and write different disk formats (MSDOS and Akai). The µPD72064 is difficult to source, but I was lucky to get useful hints on the italian forum ElectroYou.
I always thought that the headphones output of my S2 was too noisy and too loud. The book mentions the fact that it was designed to handle high-impedance and low-impedance headphones as well. All the headphones I used are low-impedance, so I decided to reduce the gain of the headphones' power amplifier, desoldering resistors R2 and R4 (originally 220kΩ) to install two 39kΩ resistors. Curiously enough, on my board, the two original resistors were 1/4W ones mounted vertically, where most of the other resistors are smaller 1/8W ones. As Colò and Gerbi mentioned, there were some discussions late in the development stage concerning the headphones that required some last-minute changes on earlier boards (like mine).
Differences between the S2 and the S2 Turbo
The Turbokit, in practice, contains a much larger space for the firmware in the EPROMs and adds 2 MB of RAM for the Ramdisk. Therefore, it does not alter the main specifications of the synthesizer. It also does not alter the 209 available waveforms in ROM. The new firmware, however, allows a much tighter control of the sound generation engine. The bigger difference is in particular the ability to select wether one sound is obtained with two oscillators or just one. To summarize, the S2 Turbo has three generator settings:
- Single: a single oscillator is used for each note. With 32 oscillators available, this allows to reach a 32-note polyphony
- Dual xf (crossfade): this is the only mode available in the normal S2, two oscillators are used per note, set to the same waveform. You can detune them to obtain a rich timbre or a chorus effect. The polyphony in this case is 16 notes at the same time
- Dual osc: two oscillators are used per note, but can be set independently to different waveforms. This allows to greatly extend the palette of the S2, keeping the polyphony to 16 notes.
In the sound generation area, is important to mention also the availability of the Sample Translator tool, which in the original S2 had to be loaded from disk (by the way, I used it several times in 2003).
Then, there is the Ramdisk. It is a battery-backed 2MB RAM area that can be used as a much faster permanent internal storage disk.
I have known since 1996 that the synthesizer offered electronic sounds that were better than the imitation of the acoustic instruments. When switched on, the standard S2 started with patch 26-2 12_St_Gtr (twelve-string guitar). It was a strange choice and Colò and Gerbi report in the book that it was criticized by the first reviewers.
Probably it was clear that the electronic sounds were top-notch and extremely expressive. In the Turbo version, most of the "performances" (i.e. combinations of patches that you can select and play rapidly in a song) available at the startup became based on electric sounds. Among the more distinctive patches of the S2/S3 line were the SYNTHEX ones. There is a clear link between GEM S2 and the legendary Elka Synthex (one of the most considered analog polysynth): Elka was acquired by GEM more or less in the same period as the S2 project was started. Many engineers and musicians who worked on the S2 came from Elka (such as Colò). For this reason, the new default performance "Europe" visible in figure 18 was set up as an airy combination of two sounds, Devil (a new Turbo-only sound) and the SYNTHEX_4. I also find that the new performances (10 performances in 10 songs, so a total of 100) show much better what you can achieve with the synth, exploiting the magnificent resonant filters, the effects, etc. Maybe as a counterbalance to the amazing electronic sounds, the demo song available on the Turbo version (none was in the standard S2) highlighted the percussions, basses, guitars and organs.
My overall impression, from using the updated S2 Turbo in the last few days, is that the S2 is now much more mature. The added flexibility of the sound generation engine is a real plus and the change under the hood is real.
Something that was considered important at the time, but that is much less relevant now, was the ability to conform to the General Midi/GS standard, first published in 1991 (therefore during the last phases of the S2 development). People used to use S2 synthesizers to play MIDI files distributed on disks, without taking the time to properly set up the sounds. While it was a pity to judge such a competent synthesizer badly only for its reduced ability to reproduce standard MIDI files, apparently that was something that got the original S2 part of the negative initial feedback. The Turbokit corrected this, of course, and also introduced the possibility to control the instrument via System exclusive MIDI messages (a VERY interesting and useful feature, even today).
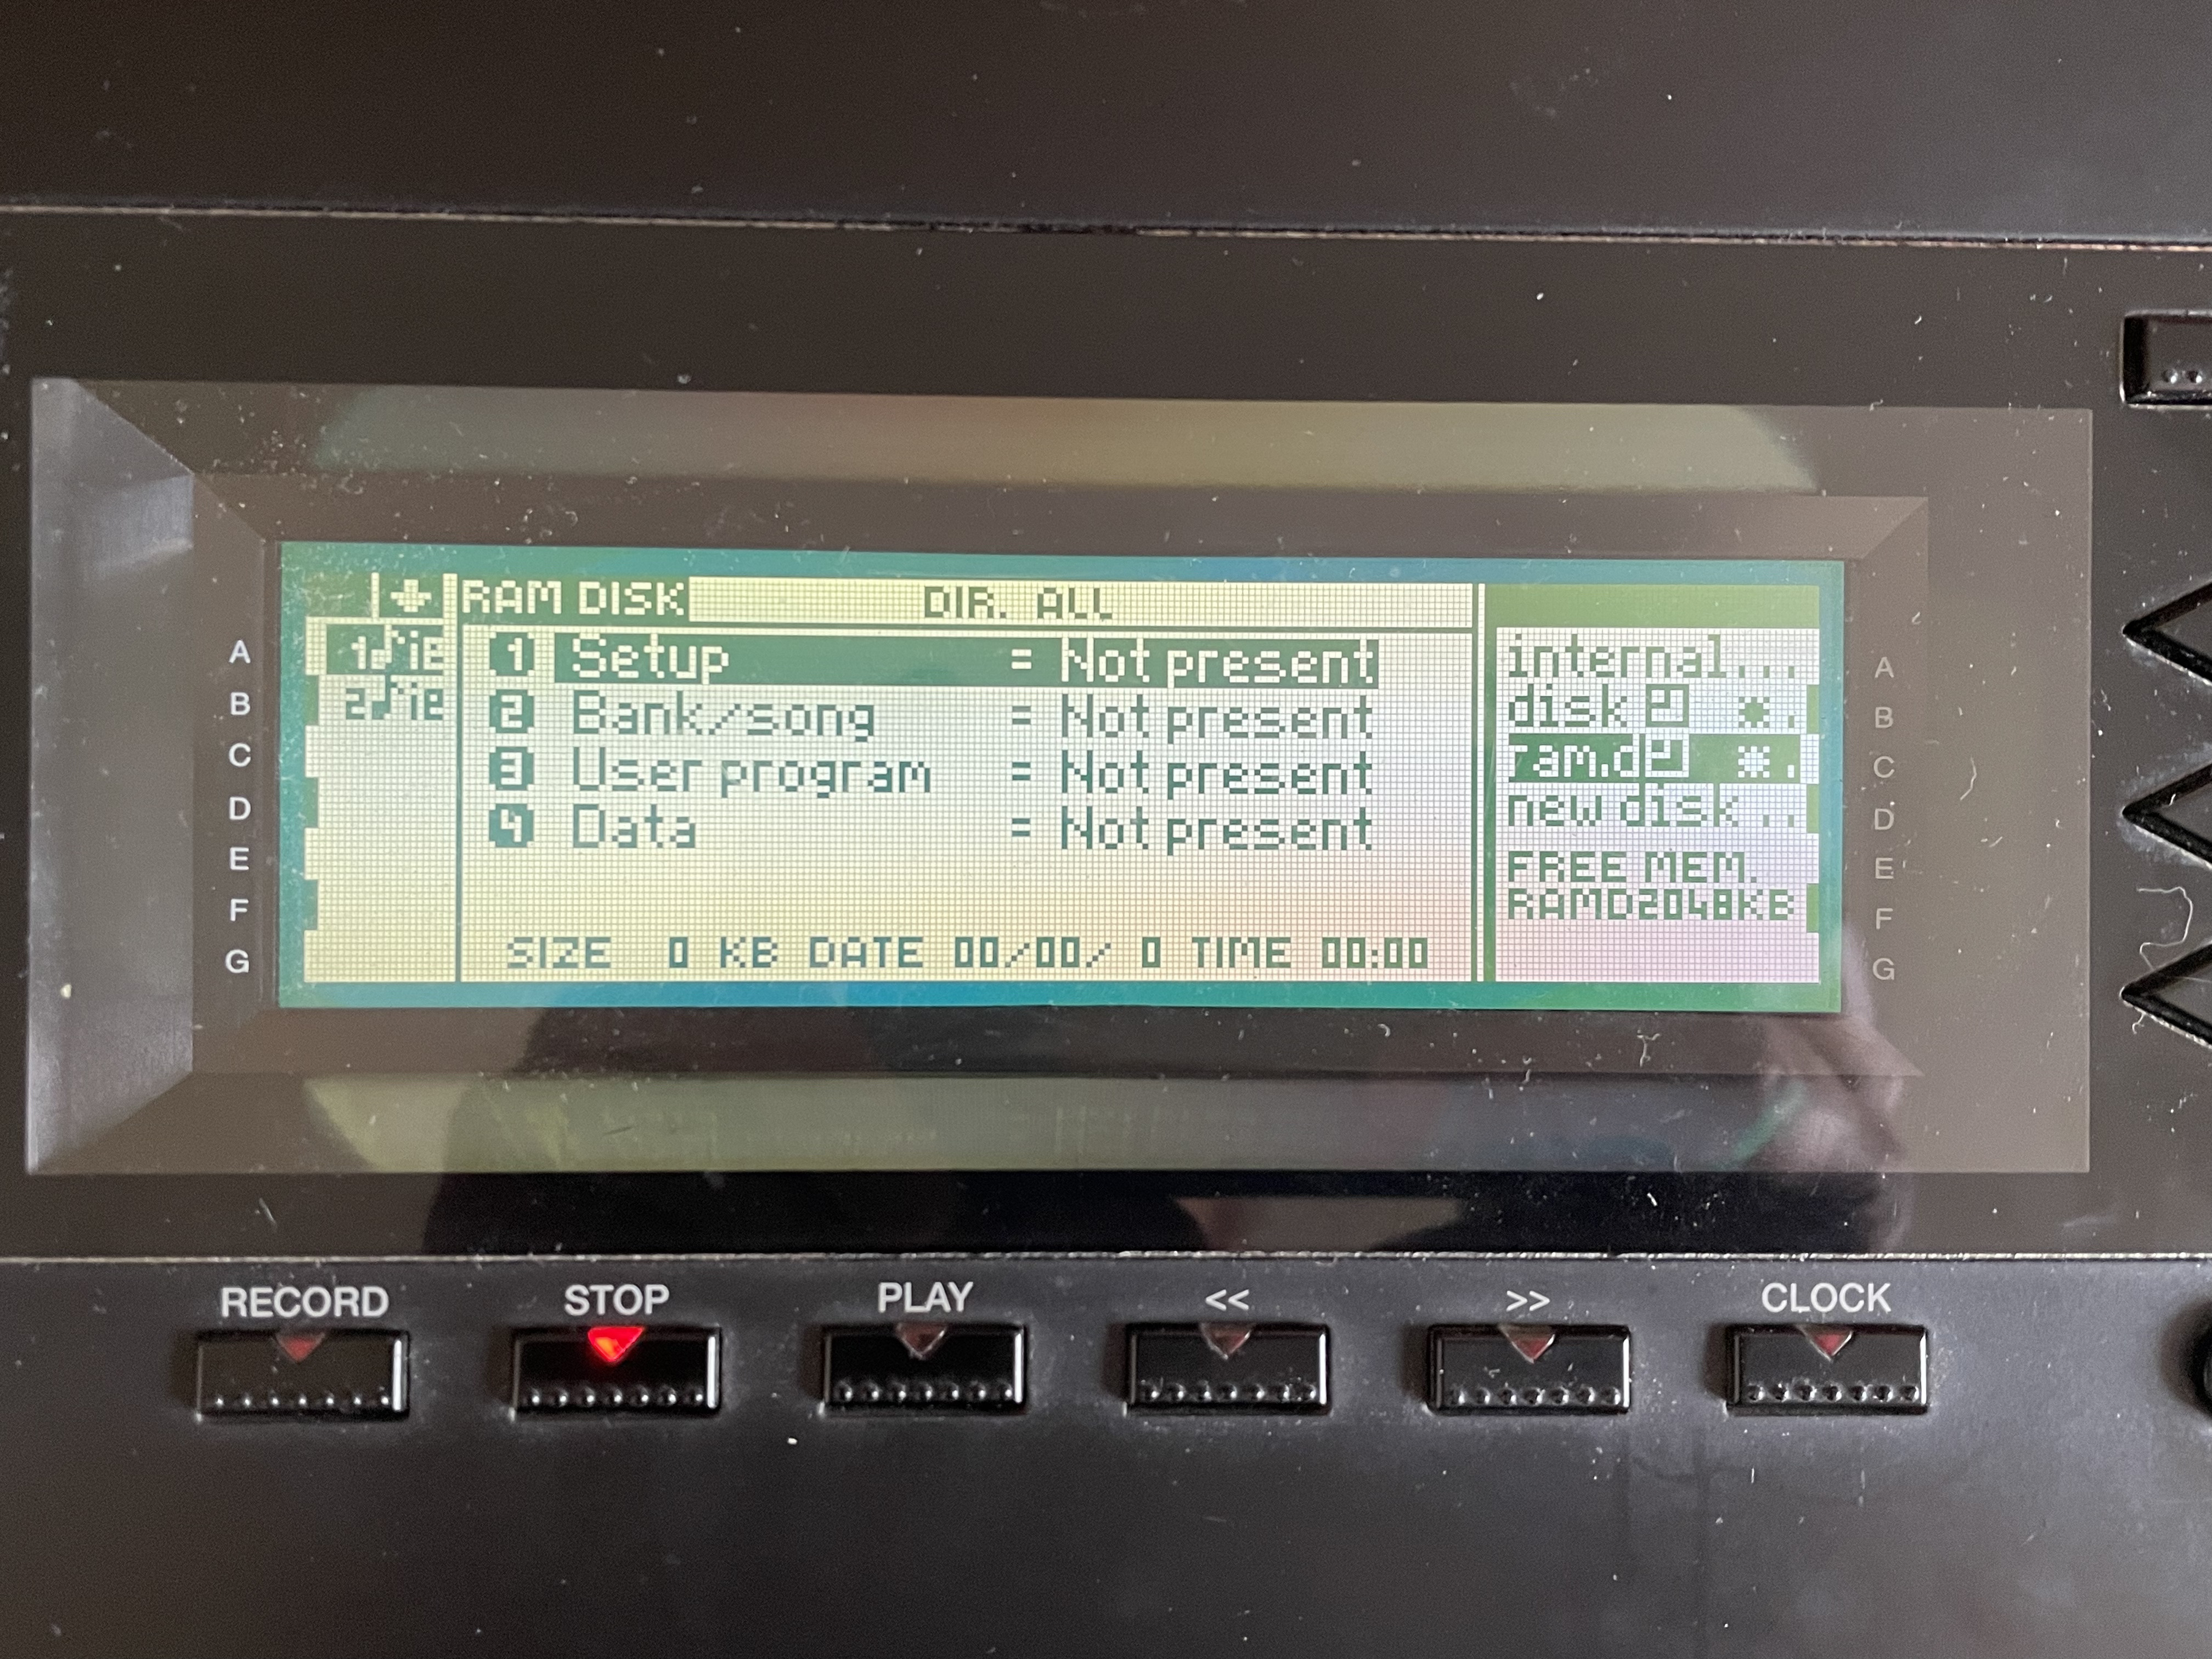
Fig. 19: the contents of an empty Ramdisk, showing that there are a whopping 2MB free!
Conclusion
I got a GEM S2 synthesizer that I bought second-hand in 1996, and it was one of the early ones produced (figure 20). In the back of my mind, I have wanted for years to upgrade my GEM S2 to the Turbo model. I could do it by building the Turbokit by myself. I'm very happy as the S2 is a very competent keyboard with electronic sounds that are still convincing and expressive today.
In this article, we described the installation of a Gotek drive emulator as well as a DIY Turbokit expansion board. Building it represented quite a challenging project for me, but I managed to make it work.
After more than 30 years, the GEM S2 remains a terrific synthesizer, with a good sound engine for the era, nice resonant filters, decent effects. It is also a very good and configurable master keyboard with a high-quality Fatar TP/8S semi-weighted keybed, polyphonic aftertouch, two configurable MIDI interfaces. The only thing that remains to be done is to build a replica of the original sticker "TURBO", to be put below the disk drive.
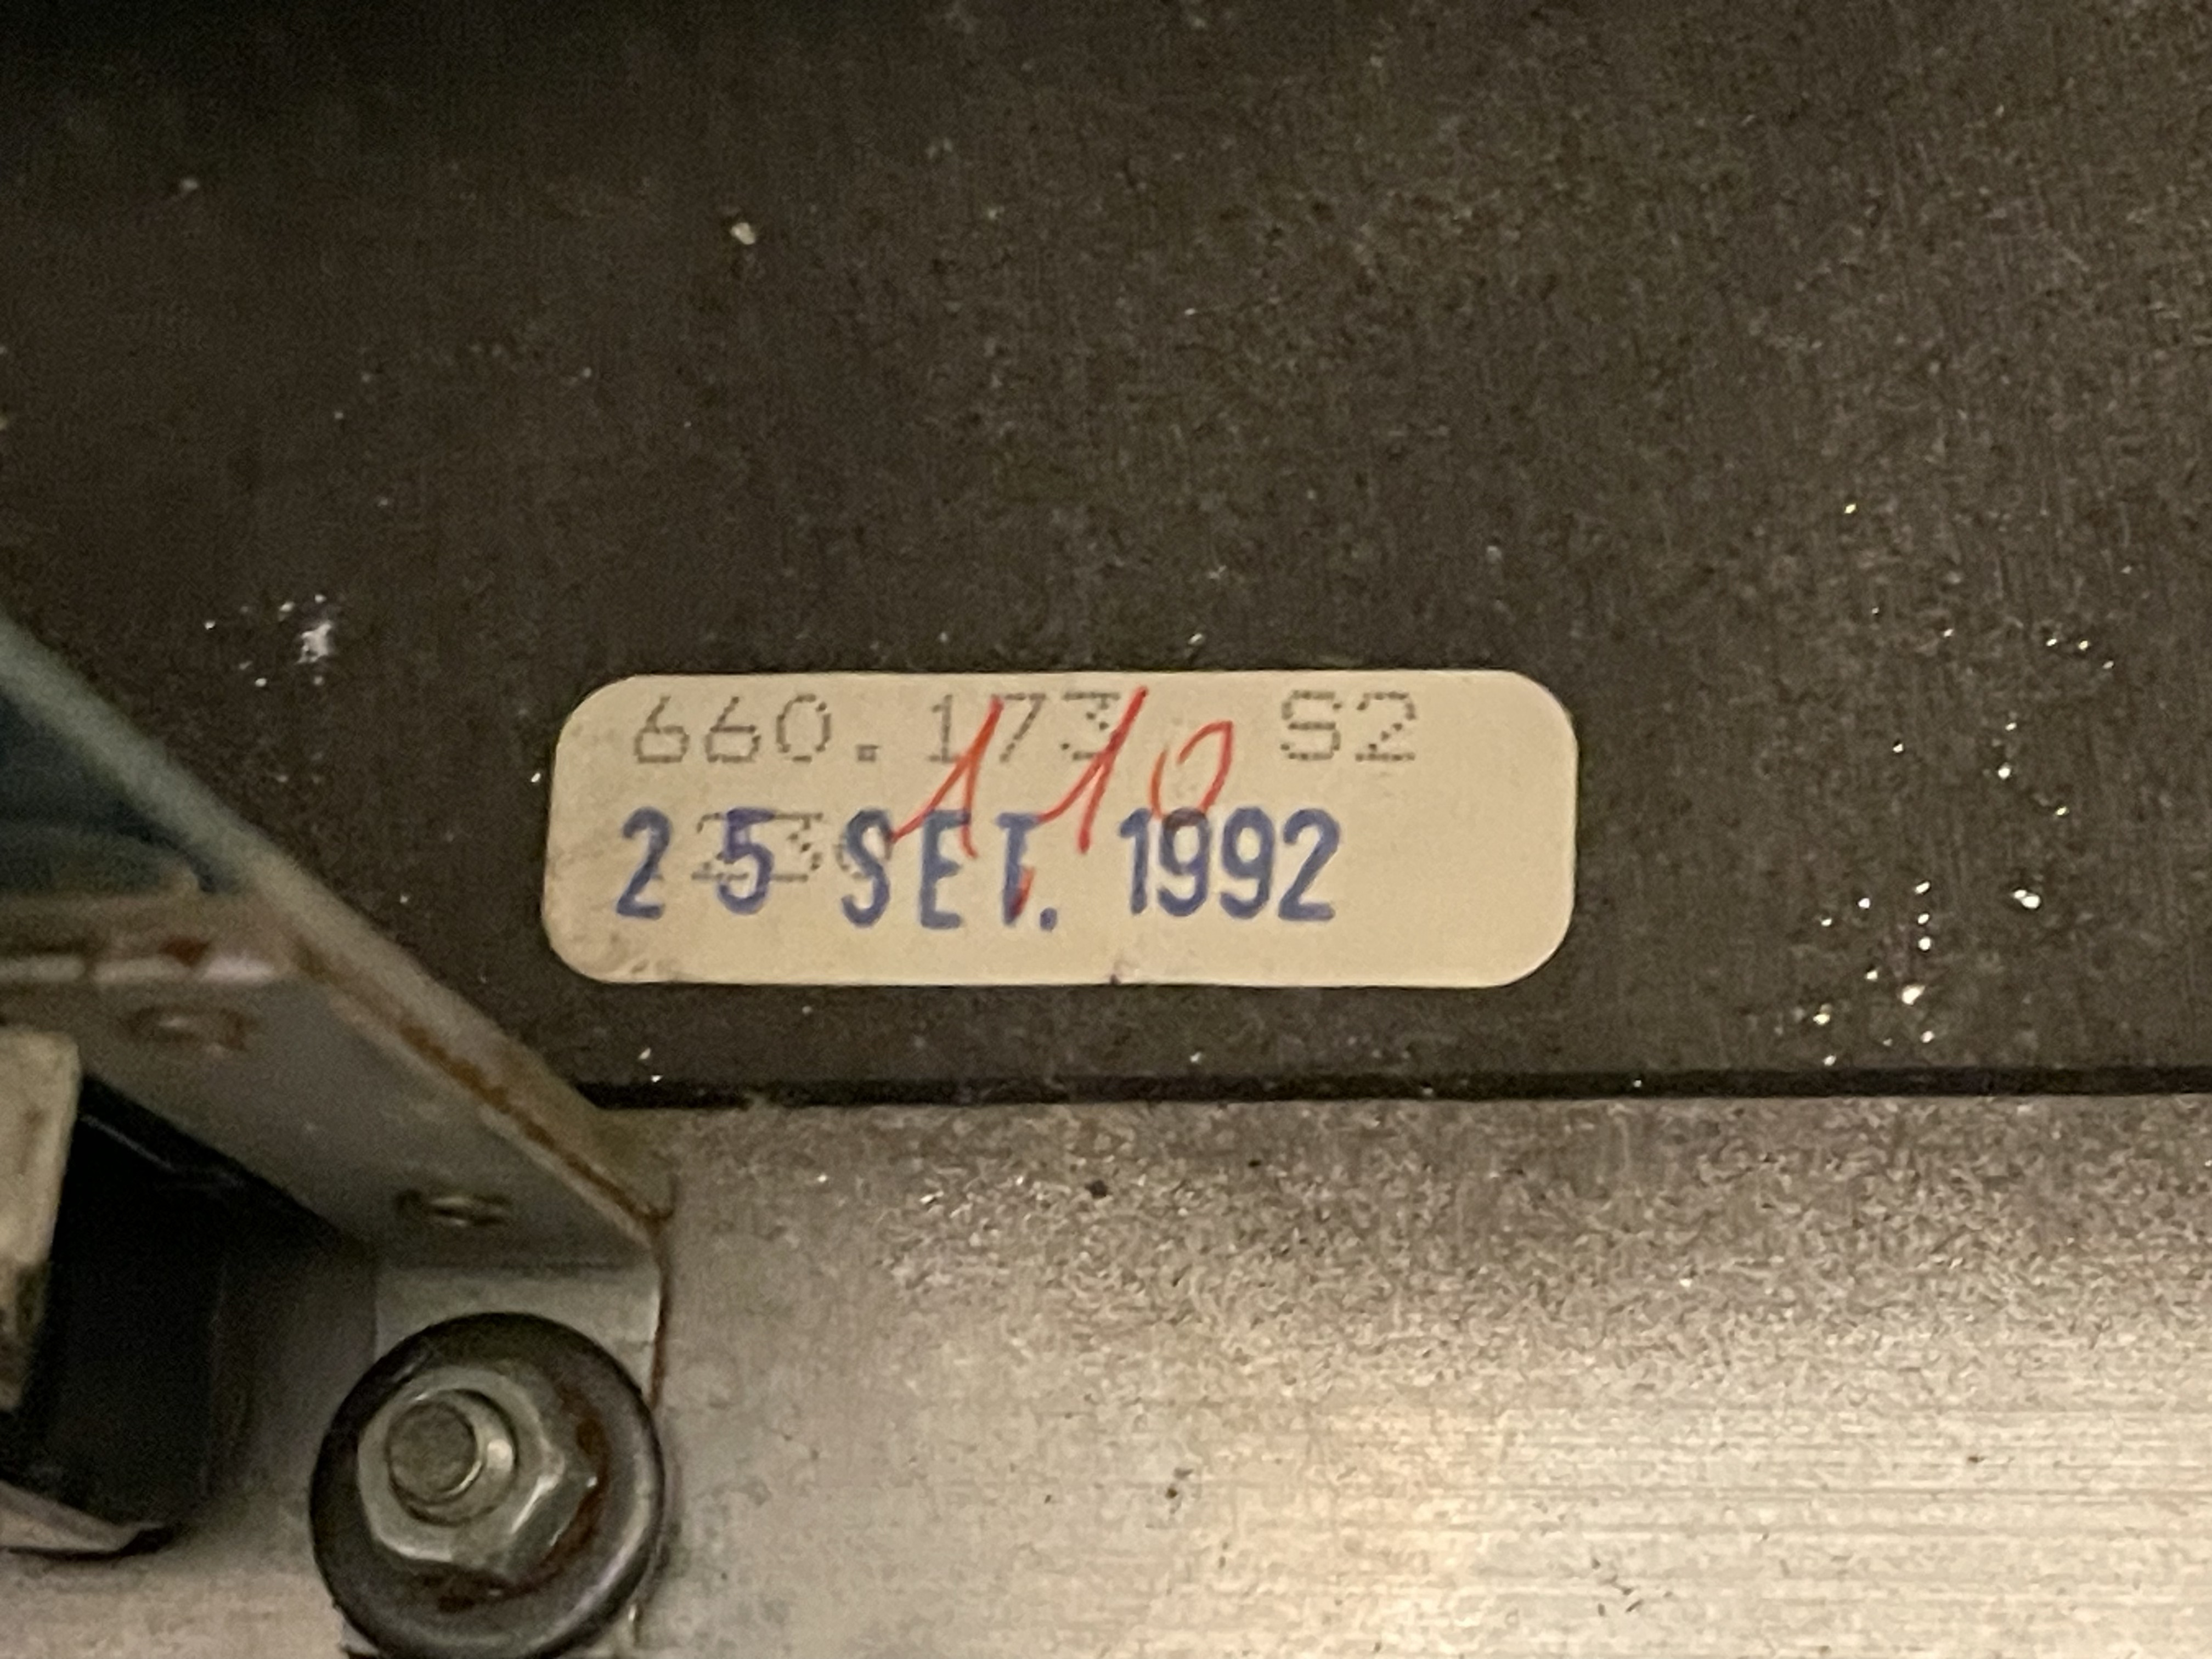
Fig. 20: labels inside my synthesizer reveal that it has been fabricated between the end of September 1992 and the beginning of October
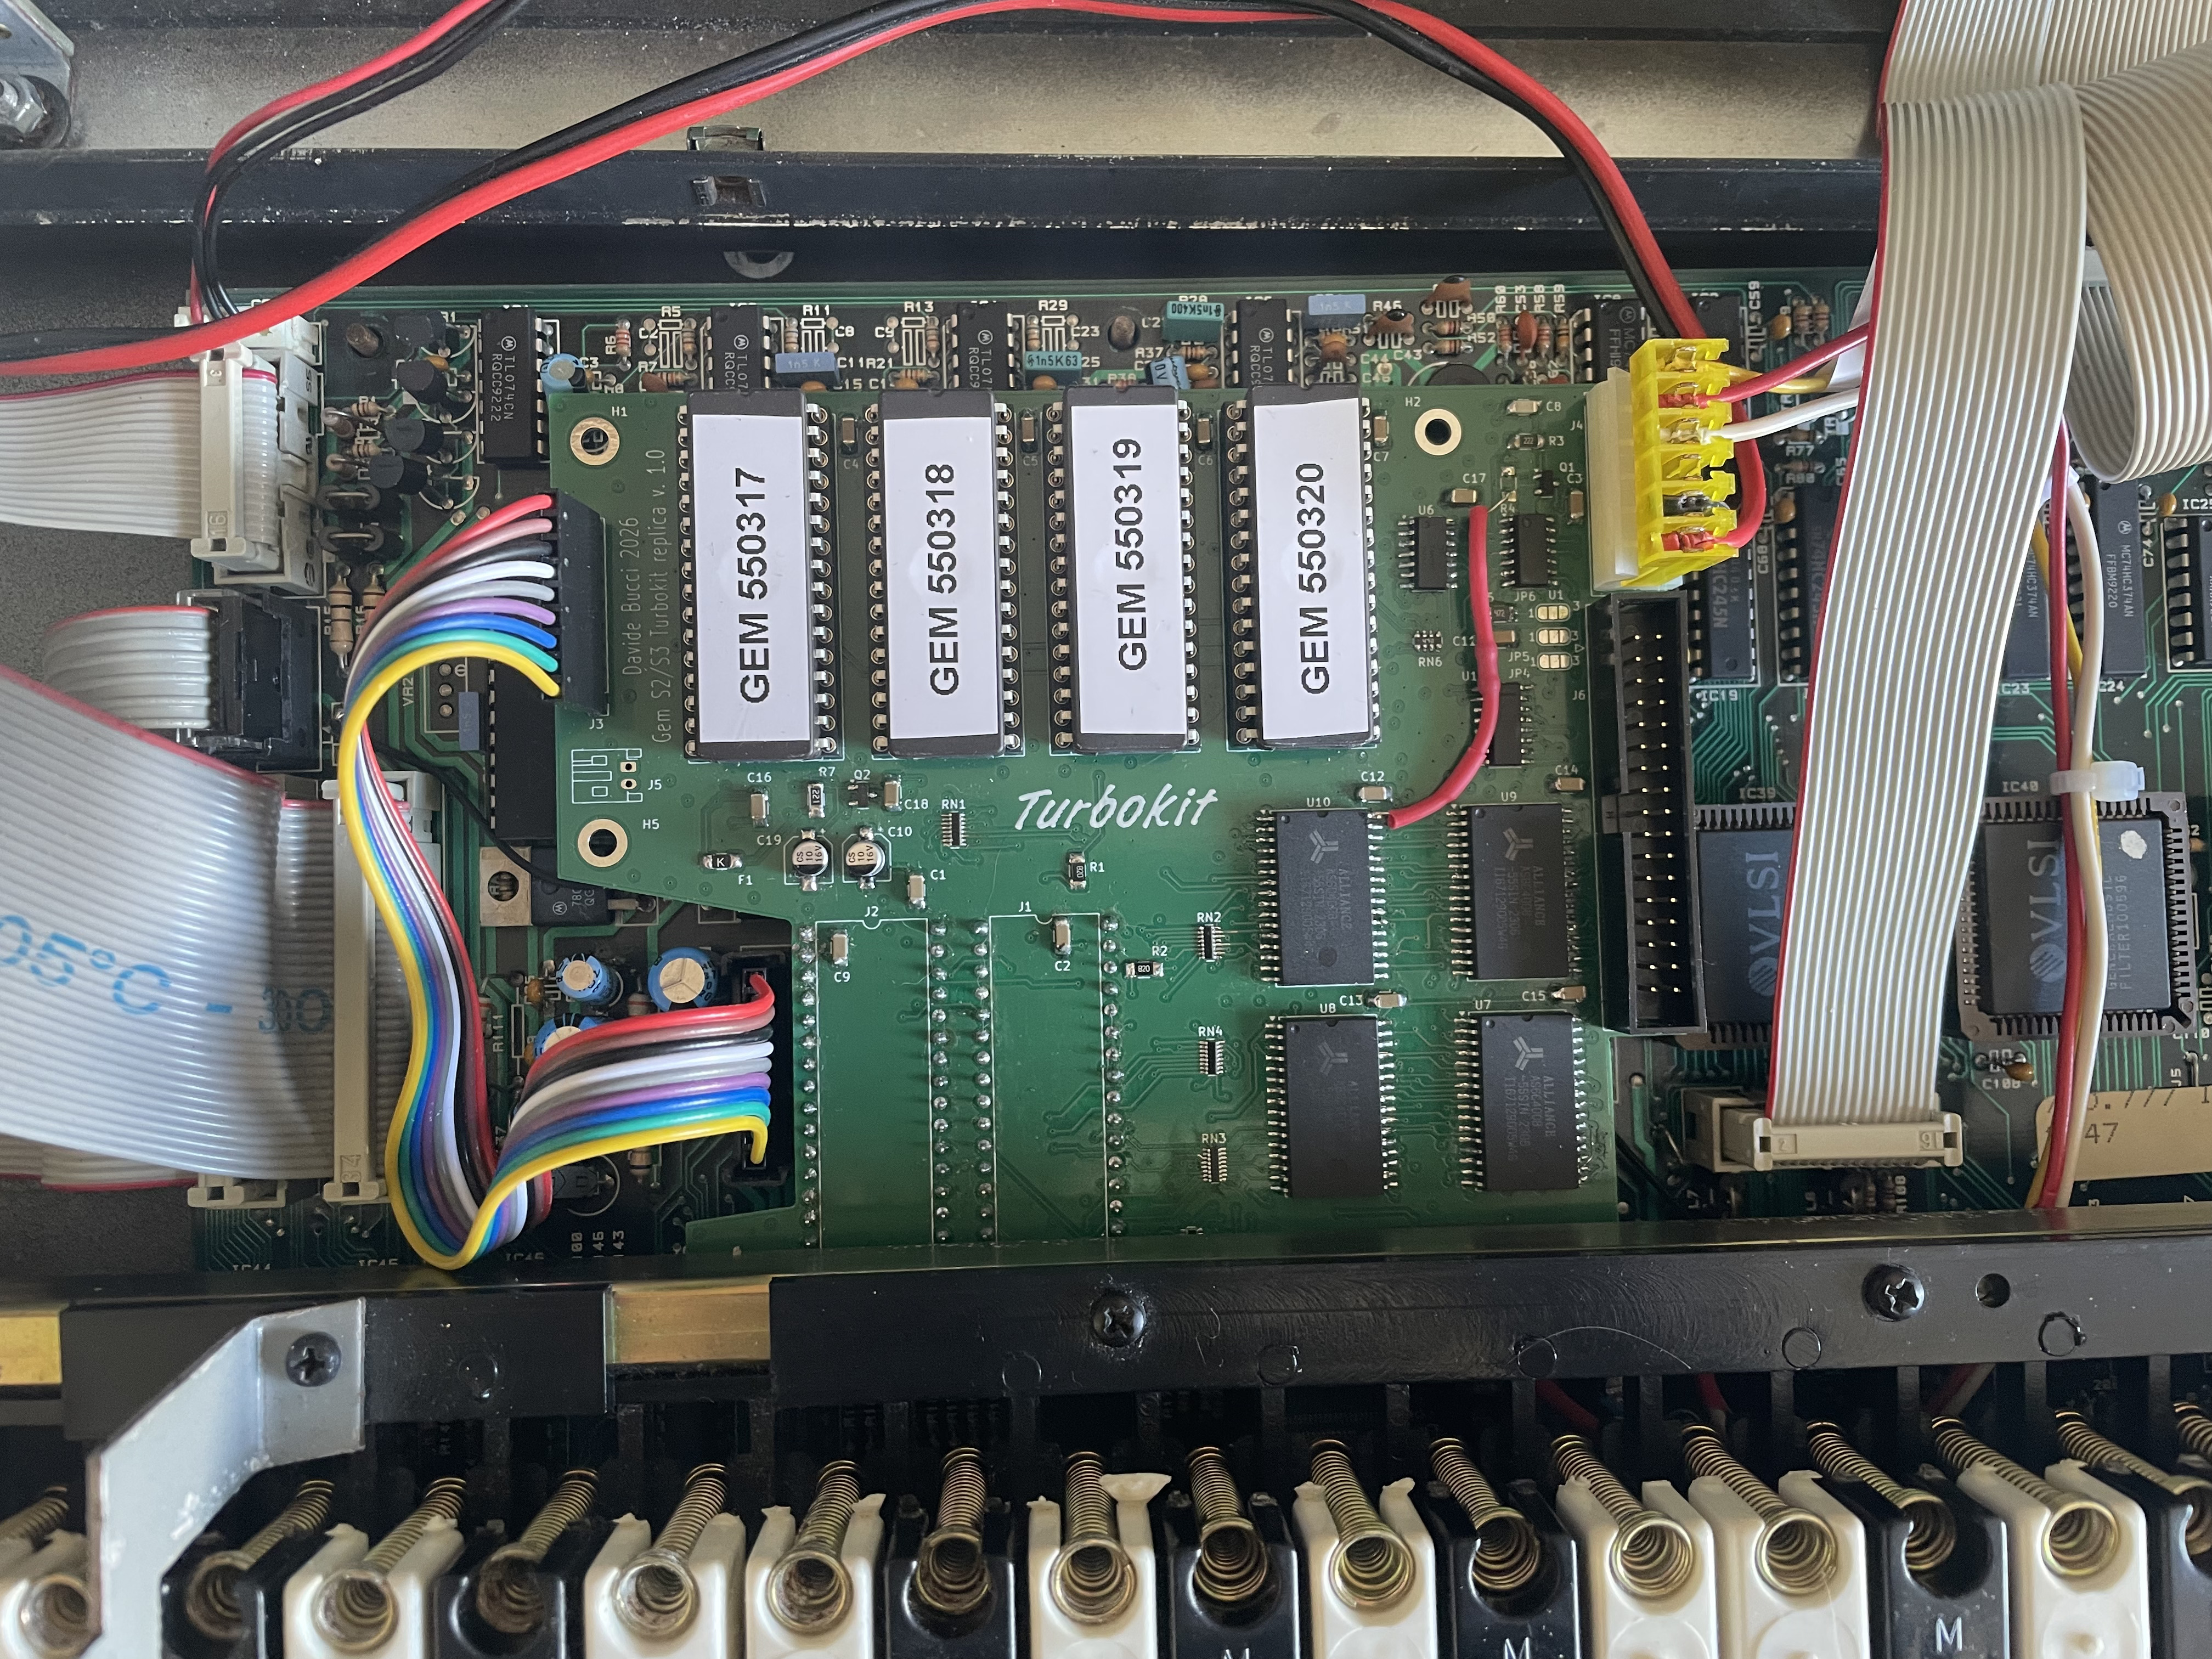
Fig. 21: a little bodge is needed for the 1.0 version of the circuit
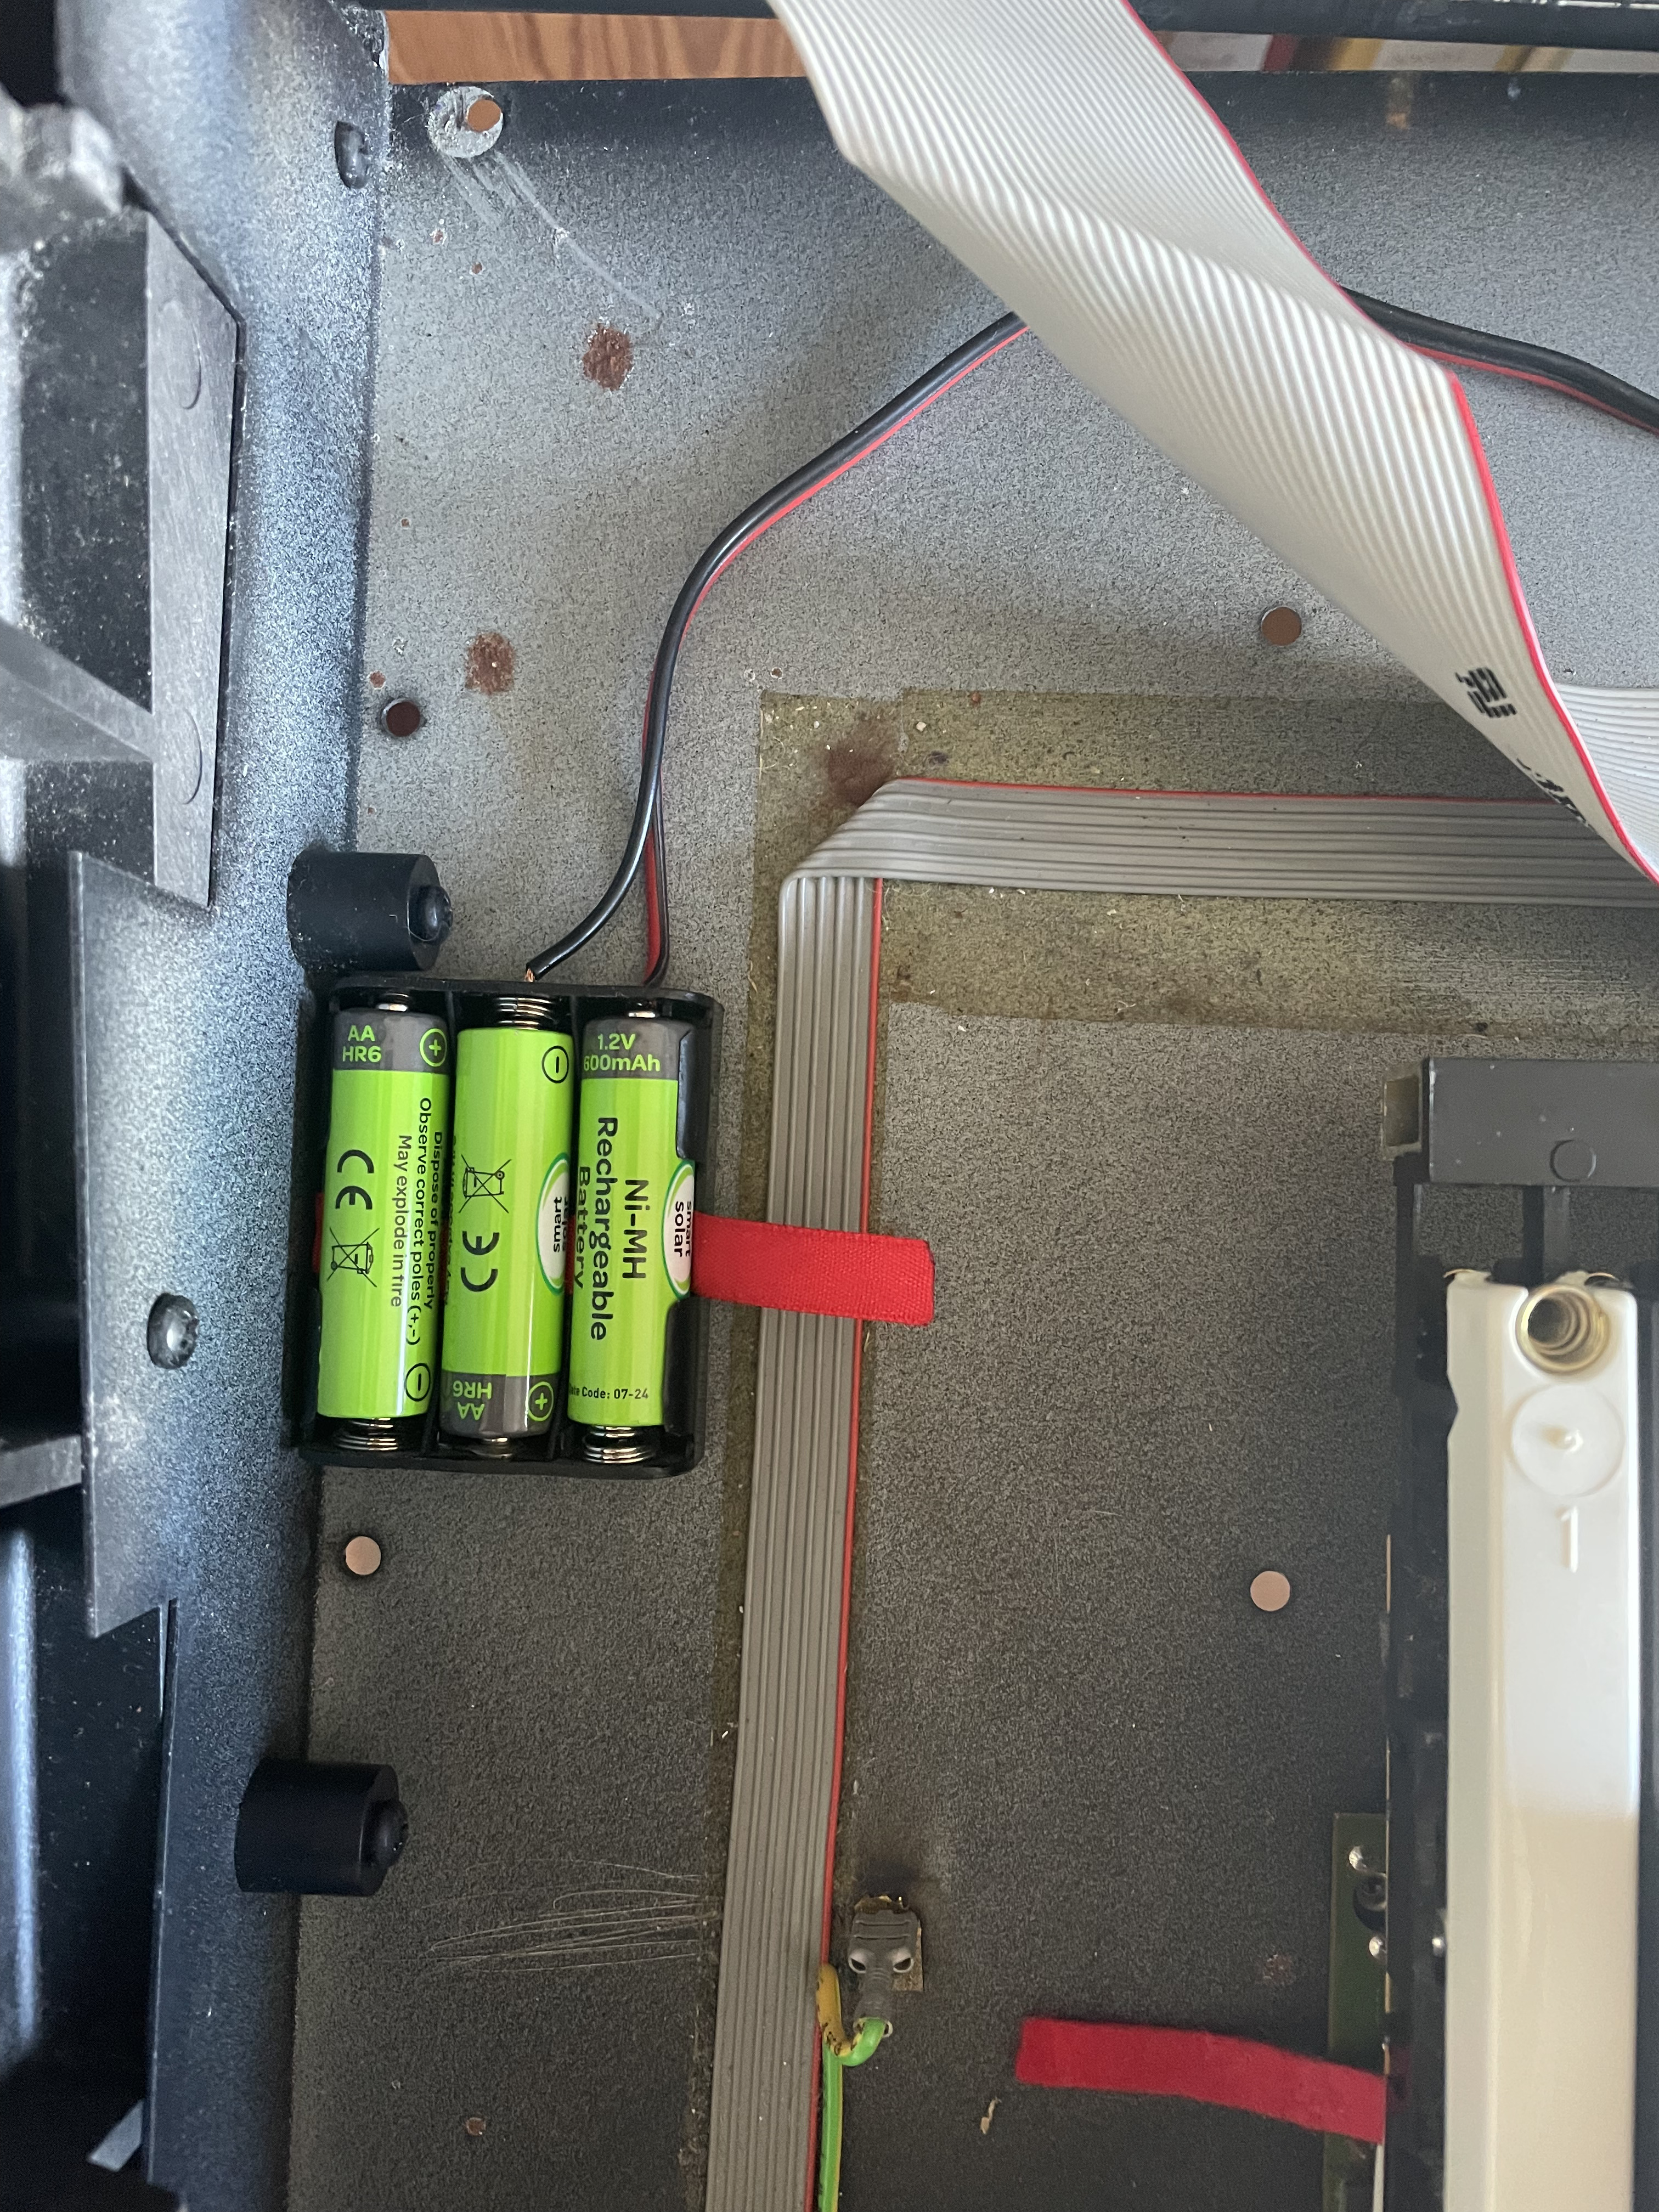
Fig. 22: the NiMh battery pack is installed far from the electronic circuits
Page log:
- May 17, 2026: added a small correction to the circuit.
- May 9, 2026: proofread.
- May 8, 2026: First version of the page.

This work is published under a Creative Commons License.